
This post introduces the first set of example PowerShell scripts that use the Ravello PowerShell module to automate your Ravello Systems environment.

The examples serve primarily to demonstrate the use of the Ravello module cmdlets. But also how easy it is to automate your Ravello environment with the help of the Ravello PowerShell module. Note that the examples directory is introduced in v1.1.2.4 of the Ravello PowerShell module.
Ravello-Framework
This script is in fact a framework that you can use to start your scripts that use the Ravello PowerShell module. The script uses the region directive to clearly show the three parts. The “Start” region handles connecting to your Ravello environment. The region “Your Ravello Automation Script” should be self-explanatory. The third region, named “Stop”, is where you disconnect from your Ravello environment.
|
1 2 3 4 5 6 7 8 9 10 11 12 13 14 15 16 17 18 19 20 21 22 23 24 25 26 27 28 29 30 31 |
# Framework to work with the Ravello module #region Start $workDomain = 'work.domain' $workProxy = 'https://proxy.work.domain:8080' $workCredentials = "$($env:USERPROFILE)\workRavelloCreds.csv" $homeCredentials = "$($env:USERPROFILE)\homeRavelloCreds.csv" # Work if($env:USERDOMAIN -match $workDomain){ $obj = Import-Csv -Path $workCredentials -UseCulture $sPswd = ConvertTo-SecureString -String $obj.Pswd -AsPlainText -Force $cred = New-Object System.Management.Automation.PSCredential ($obj.User, $sPswd) $connect = Connect-Ravello -Credential $cred -Proxy $workProxy } # Home else{ $obj = Import-Csv -Path $homeCredentials -UseCulture $sPswd = ConvertTo-SecureString -String $obj.Pswd -AsPlainText -Force $cred = New-Object System.Management.Automation.PSCredential ($obj.User, $sPswd) $connect = Connect-Ravello -Credential $cred } #endregion #region Your Ravello Automation Script #endregion #region Stop Disconnect-Ravello -Confirm:$false #endregion |
Annotation
Line 10,17: I use this logic that allows me to use the same script to connect to my Ravello environment from multiple locations. In this example that would be work and home. My work connection requires different credentials, which the script fetches from a CSV file.
Line 14: Note that the Connect-Ravello cmdlet supports running from behind a proxy.
Ravello-Import-vSphere-VM
This example shows how to upload a VM from your vSphere environment into your Ravello Image library. Once in the Image library, you can then use the VM in any of your Ravello Applications.
Prepare your VM(s) locally, upload them to the Ravello cloud and then give access through for example Ephemeral Tokens (see an example in Ravello PowerShell module v1.1) to specific users.
|
1 2 3 4 5 6 7 8 9 10 11 12 13 14 15 16 17 18 19 20 21 22 23 24 25 26 27 28 29 30 31 32 33 34 35 36 37 38 39 40 41 42 43 44 45 46 47 48 49 50 51 52 53 54 55 56 57 58 59 60 61 62 63 64 65 66 67 68 69 70 71 72 73 |
#requires -Version 3 -module Ravello # Script will import a VM from a vSphere environment # into your Ravello Image library # param( [Parameter(Mandatory=$true)] [string]$VmName, [Parameter(Mandatory=$true)] [string]$VMHost, [Parameter(Mandatory=$true)] [string]$EsxUser, [Parameter(Mandatory=$true)] [string]$EsxPassword ) $PCLI = 'VMware.VimAutomation.Core' # Load PowerCLI Try { Get-PSSnapin -Name $PCLI -ErrorAction Stop | Out-Null } Catch { Add-PSSnapin -Name $PCLI } # Get credentials $sEsxPswd = ConvertTo-SecureString -String $EsxPassword -AsPlainText -Force $credEsx = New-Object System.Management.Automation.PSCredential ($EsxUser, $sEsxPswd) Connect-VIServer -Server $VMHost -Credential $credEsx | Out-Null # Get VMX path $vm = Get-VM -Name $vmName while($vm.PowerState -ne 'PoweredOff') { Stop-VM -VM $vm -Confirm:$false sleep 5 } # Remove existing Image $img = Get-RavelloImage -ImageName $vmName if($img) { $img | Remove-RavelloImage -Confirm:$false } # Import VM $sImport = @{ EsxVmPath = $vm.ExtensionData.Config.Files.VmPathName EsxCredential = $credEsx EsxServer = $vm.ExtensionData.VMHost.Name Confirm = $false } Import-Ravello @sImport Disconnect-VIServer -Server $VMHost -Confirm:$false # Set VM as verified $flag = '1stPass' while('1stPass','PARSING' -contains $flag) { $img = Get-RavelloImage -ImageName $vmName $flag = $img.loadingStatus } if($img.loadingStatus -ne 'DONE') { $img | Update-RavelloImage -Description 'Imported from vSphere' -Confirm:$false } |
Annotation
Line 9: provide the DisplayName of the VM that you want to import
Line 12-15: provide credentials to connect to the ESXi node hosting the VM you want to import into the Ravello Image library
Line 21-28: This will load the core PowerCLI cmdlets, which we will need to connect and retrieve the target VM.
Line 40: The target VM needs to be powered off, due to consistency reasons.
Line 45-49: We remove any Images with the same name that might already be there. Note that Ravello allows having Images with identical names in the library.
Line 52-58: For the Import-Ravello cmdlet I’m using splatting to have a cleaner and more readable script. Note that such an import might take some time, depending on the speed of your Internet connection and the size of the VM.
Line 64-68: In a loop we check the Status of the Image. That way we can determine when the upload is completed.
Test-VNC-RDP
This script will check for a number of VMs in an Application if the RDP and VNC connectivity is ready.
|
1 2 3 4 5 6 7 8 9 10 11 12 13 14 15 16 17 18 19 20 21 22 23 24 25 26 27 28 29 30 31 32 33 34 35 36 37 38 39 40 41 42 43 44 45 46 47 48 49 50 51 52 53 54 55 56 57 58 59 60 61 62 63 64 65 66 67 68 69 70 71 72 73 74 75 76 77 78 79 80 81 82 83 84 85 86 87 88 |
#requires -Version 3 -module Ravello # Script will check the status of the VNC and RDP connection to a VM running # in a Ravello application # param( [Parameter(Mandatory=$true)] [string]$ApplicationName, [Parameter(Mandatory=$true)] [string[]]$VmNames, [DateTime]$Finish = (Get-Date).AddMinutes(5) ) function Get-VncStatus { param( [string]$VncUri ) Process { $web = Invoke-WebRequest -Uri $VncUri if($web) { if($web.StatusCode -eq 200){'OK'} else{$web.StatusCode} } else{'No VNC'} } } function Get-RDPStatus { param( [PSObject]$VM ) process { Write-Verbose -Message $VM.externalFqdn $port = 3389 $rdp = $VM.suppliedServices | Where-Object -FilterScript {$_.protocol -eq 'RDP'} if($rdp.externalPort) { $port = $rdp.externalport } Try {$netDns = [System.Net.Dns]::GetHostAddresses($VM.externalFqdn)} catch [Exception] {return 'No DNS'} Try { $netPort = New-Object System.Net.Sockets.TCPClient -ArgumentList $VM.externalFqdn, $port $netPort.Close() 'OK' } Catch{'No RDP'} } } $report = @() while((Get-Date) -le $Finish) { $obj = [ordered]@{ Time = Get-Date -Format 'hh:mm:ss' } $i = 1 foreach($vmName in $VmNames){ $vm = Get-RavelloApplicationVm -ApplicationName $ApplicationName -VmName $vmName -Deployment $obj.Add("VM$($i)",$vmName) $obj.Add("VM$($i)Dns",$vm.externalFqdn) $obj.Add("VM$($i)State",$vm.state) $vncStatus = &{ $uri = Get-RavelloApplicationVmVnc -ApplicationName $ApplicationName -VmName $VmName if($uri) {Get-VncStatus -VncUri $uri} else {'No NVC Uri'}} $obj.Add("VM$($i)VNC",$vncStatus) $rdpStatus = &{Get-RDPStatus -VM $vm} $obj.Add("VM$($i)RDP",$rdpStatus) $i++ } $row = New-Object -TypeName PSObject -Property $obj $report += $row $row Start-Sleep -Seconds 15 } |
Annotation
Line 7-11: The script requires an Application name and one or more VM names inside that Application for which you want to test the VNC and RDP connectivity readiness. Optionally you can provide a DateTime when the testing should stop. The default is that the tests will run for 5 minutes.
Line 14-20: This helper function uses the Invoke-WebRequest cmdlet to verify if the VNC connectivity is there.
Line 31-56: Another helper function that verifies if the RDP connectivity is available. This testing is a bit more complex, since we first have to verify if the DNS entry for the RDP connection is already there. Once that DNS entry is there, the function tests if a socket to port 3389 can be opened.
Line 68-79: The results of the tests are entered into an [ordered] custom object.
Line 84-85: The result is displayed on screen, but also saved to an array, named $report, which you can eventually save to a file.
The result looks something like this (this comes from running the script against 2 VMs in one my Applications).

Check-Maintenance
This is a script that I used recently to verify if any of my applications was impacted by a maintenance intervention that Ravello had announced.
In the announcement, the impacted systems were described like this
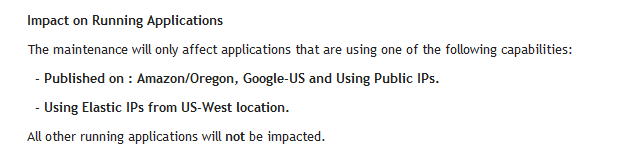
I didn’t want to browse through all my applications and their VMs to verify if this had any impact on me. That’s why I quickly threw together the following script.
|
1 2 3 4 5 6 7 8 9 10 11 12 13 14 15 16 17 18 19 20 21 22 23 24 25 |
# Check if VMs with Public IP in affected regions $maintInfo = @" Cloud,Region Google Cloud,us-central1 Amazon,Oregon "@ Write-Output "`r==> Checking affected public IPs" foreach($app in Get-RavelloApplication){ foreach($cloud in ($maintInfo | ConvertFrom-Csv)){ if($cloud.Cloud -eq $app.deployment.cloud -and $cloud.Region -eq $app.deployment.regionName){ foreach($vm in Get-RavelloApplicationVm -ApplicationId $app.id){ $vm.networkConnections | where{$_.ipConfig.hasPublicIp} | %{ Write-Output "$($cloud.Cloud)/$($cloud.Region)/$($app.name)/$($vm.name)" } } } } } # Check if any with affected Elastic IP $eipInfo = @('US-West') Write-Output "`r==> Checking affected public IPs" Get-RavelloElasticIP | where{$eipInfo -contains $_.Location} | Select ownerAppName,ownerVmName,ip |
Annotation
Line 2-6: The 1st set of definitions, packaged in an inline CSV file
Line 9-19: Run through all the Applications, and for each deployed VM, check if it has a Public IP and is hosted in any of the affected clouds/regions.
Line 22: The Elastic IPs from the affected region as an array
Line 24: Get all the Elastic IPs in the Organisation, and check if they are in the affected region.
This concludes my first set of examples that I included with the Ravello PowerShell module, starting from build v1.1.24.

If you have suggestions for other example scripts, or even better, if you want to contribute your own example script(s), feel free to create a Pull Request on GitHub.
Enjoy!
Julius Kovac
+1