
Photon 2.0 is definitely a guest OS that is useful in a VMware vSphere environment. It is light-weight, easy to manage, security hardened and comes with the Docker daemon.
That last feature makes it an ideal environment to explore new applications, isolated from your live platforms. As an example, quite a few of us got to know PowerShell Core with VMware PowerCLI, while running it in a Docker container, well shielded from our other platforms.
There are numerous articles and blog posts that describe how set up a Photon 2.0 VM, but most of these use the ovftool or the vSphere Web Client to install it. Followed by quite of a bit of editing config files, to have your Photon 2.0 VM running the way you prefer it.
With the latest version of my Invoke-VMScriptPlus function, you can now automate this entire process, the SDDC way!
Update August 21st 2018
- Added “reboot” action
- Added optional Environment variables for the customisation scripts
- Added Folder field for template destination
Intro
As I briefly mentioned in the introduction paragraph, setting up a VM with the Photon OS 2.0, is a two-step process.
- Deploy the appliance
- Configure the OS
The first step is rather straight-forward with PowerCLI’s Import-VApp cmdlet.
The second step, configuring the Photon OS, is presented as a manual step in most of the articles I could find. Till now!
With my Invoke-VMScripPlus function, this step can now also be automated. And that automation step is driven by a JSON file. This JSON file is the part that you place under version control.
The following scenario, which I’m currently using, creates a VM with a configured Photon 2.0 guest OS. Then converts that VM into a Template, which can then be used to roll out your VMs.
Create a Photon VM Template
This step is fully automated and driven by a JSON configuration file. In a matter of minutes you can create a new Photon 2.0 template, without even logging on to the machine!
The JSON Configuration file
The objective to have all configuration parameters in a flat text file is of course to be able to easily place it under version control and to easily compare between versions.
The JSON file contains a number of Level-1 entries, each specifying part of the final configuration of the Photon Template.
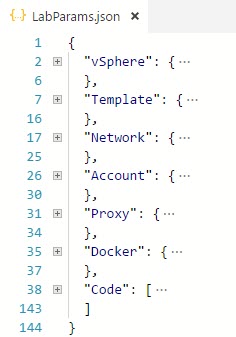
- vSphere: describes the Location for the template
- Template: characteristics of the Template
- Network: the network configuration inside the guest OS
- Account: the current and new password for the root account
- Proxy: the proxy settings, if present
- Docker: the docker configuration
- Code: a collection of customisation scripts
vSphere

- VMHost: a cluster or an ESXi node where the VM will be installed. If you specify a cluster, the script takes a random ESXi node in that cluster.
- Storage: a datastorecluster or datastore where the VM will be installed.
- OvaPath: where the script can find the Photon 2.0 ova file. Note the escaped back-slashes in the path.
Template
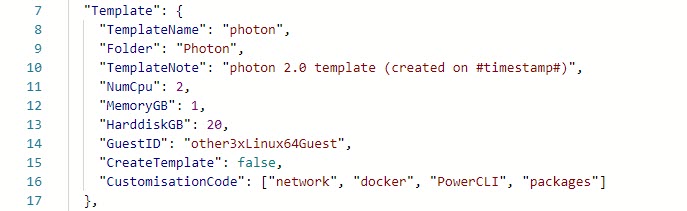
- TemplateName, TemplateNote: self explanatory
- Folder: a VM type folder where the template shall be stored
- NumCpu, MemoryGB, HarddiskGB: self explanatory
- GuestID: has to be other3xLinux64Guest for Photon 2.0
- CreateTemplate: when set to false, the script will not power off the VM, nor will it convert the VM into a Template. This can be used will fine-tuning the customisation scripts (see later).
- CustomisationCode: the names of the customisation scripts that will be executed once the VM is installed. See later in the Code section.
Network
Since most of the customization of the Photon guest OS was done when we created the Template, this step requires very little extra customization steps.
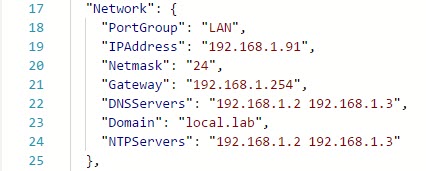
I assume these settings all speak for themselves. Nothing out of the ordinary, just you regular network settings. Perhaps one point to note, when you have multiple values for a field, separate them with a space.
Account
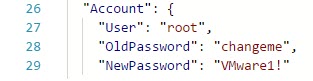
Again, quite straight-forward. The account, and the old and new password.
Proxy
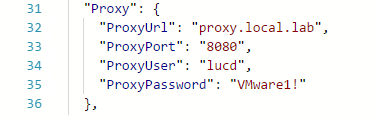
When your environment into which you are installing the VM is located behind a proxy, you can specify the proxy details in this section. This is required to get the Photon repositories working (tdnf), and also the docker repositories,
Docker
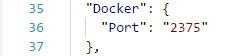
Only one setting, the default port to access docker.
Code
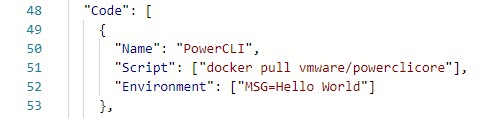
Under the Code section, you can define a number of customisation scripts, that will be executed inside the Photon 2.0 guest OS. Each entry has a two fixed subfields.
- Name: the name for this particular customisation script. This is the name that is used in the Template section, in CustomisationCode field.
- Script: the actual customisation script. Due to restrictions in the JSON syntax, the script must be provided as an array of strings. Each line of the script is an element in this array
- Environment: an array with environment variables that will be passed to the environment where the customisation script is executed.
In the example above, the customisation script is a one-liner. Hence one string in the Code array. In this example, the Code contains the line to pull the docker container that contains VMware PowerCLI.
There are of course multi-line customisation scripts. In that case the array contains multiple elements. The following example is an excerpt of the docker customisation script. As you notice, the code also contains comment lines and empty lines.
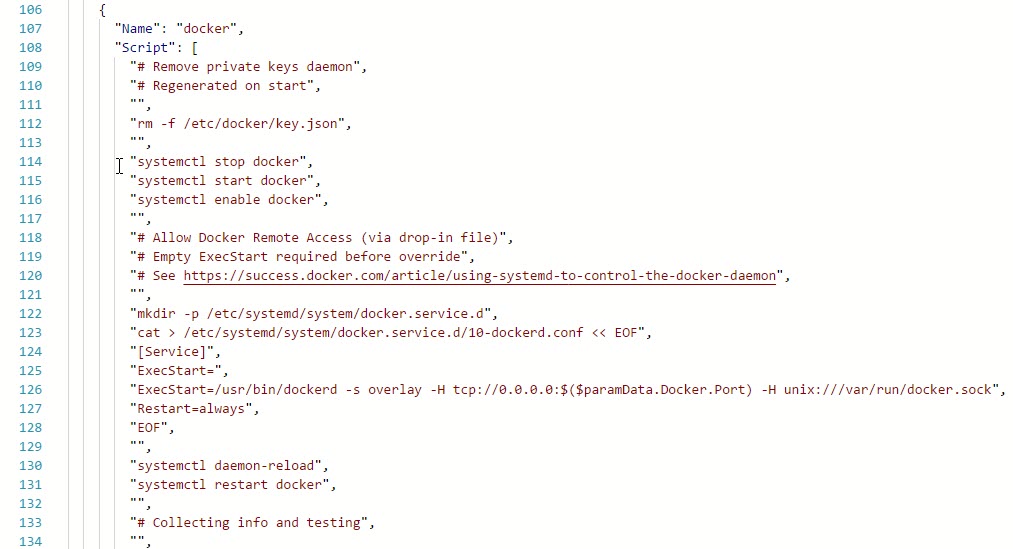
Since we do not want to hard-code values in our customisation scripts, we use a PowerShell style notation to refer to variables defined in other sections in the JSON file.
In line 126 of excerpt above, we use the expression $($paramData.Docker.Port) to refer to the port number we defined in the Docker section.
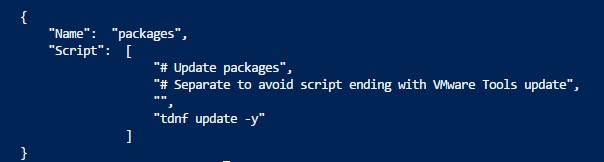
To avoid that you have to type in your customisation scripts in this specific JSON format, the following short script can help you convert your regular bash script to JSON notation.
|
1 2 3 4 5 6 7 8 9 10 11 12 13 14 15 16 |
function Convert-Script2Json { [cmdletbinding()] param( [Parameter(Mandatory = $true)] [string]$ScriptName, [Parameter(Mandatory = $true)] [string[]]$Script ) $obj = New-Object PSObject -Property @{ Name = $ScriptName Script = $script.Split("`n") | %{$_.TrimEnd("`r")} } $obj | ConvertTo-Json } |
A sample run shows you how you could use the above code.
|
1 2 3 4 5 6 7 8 |
@' # Update packages # Separate to avoid script ending with VMware Tools update tdnf update -y '@ Convert-Script2Json -ScriptName packages -Script $code |
Will result in the following output, which you can copy/paste into your JSON file.
The New-PhotonTemplate function
Before you can run the New-PhotonTemplate function, you will need two functions that are used in the function. These are
- Invoke-VMScriptPlus from my Invoke-VMScriptPlus v2 post.
- Set-VMKeystrokes, from William Lam’s Automating VM keystrokes using the vSphere API & PowerCLI
You have multiple options to make these two functions available to the New-PhotonTemplate function.
- Add them to the .ps1 file where you copied the New-PhotonTemplate function
- Store the two functions in separate .ps1 files, and dot-source these .ps1 files before calling the New-PhotonTemplate function
- Create a module, and add the two functions to that module
The Code
|
1 2 3 4 5 6 7 8 9 10 11 12 13 14 15 16 17 18 19 20 21 22 23 24 25 26 27 28 29 30 31 32 33 34 35 36 37 38 39 40 41 42 43 44 45 46 47 48 49 50 51 52 53 54 55 56 57 58 59 60 61 62 63 64 65 66 67 68 69 70 71 72 73 74 75 76 77 78 79 80 81 82 83 84 85 86 87 88 89 90 91 92 93 94 95 96 97 98 99 100 101 102 103 104 105 106 107 108 109 110 111 112 113 114 115 116 117 118 119 120 121 122 123 124 125 126 127 128 129 130 131 132 133 134 135 136 137 138 139 140 141 142 143 144 145 146 147 148 149 150 151 152 153 154 155 156 157 158 159 160 161 162 163 164 165 166 167 168 169 170 171 172 173 174 175 176 177 178 179 180 181 182 183 184 185 186 187 188 189 190 191 192 193 194 195 196 197 198 199 200 201 202 203 204 205 206 207 208 209 210 211 212 213 214 215 216 217 218 219 220 221 222 223 224 |
function New-PhotonTemplate { <# .SYNOPSIS Create a Template with the Photon 2.0 guest OS .DESCRIPTION This function will create a new Template with the Photon 2.0 guest OS. The parameters and the configuration scripts are passed via a JSON file. .NOTES Author: Luc Dekens Version: 1.0 11/08/18 Initial release 1.1 16/08/18 Create function Added support for Reboot action Added support for environment variable 1.2 17/08/18 Added Folder (in JSON file) support .PARAMETER JSONPath The location of the JSON file with the configuration parameters .PARAMETER LogFile Optional file for capturing logging information. This includes the output of the customisation scripts .EXAMPLE New-PhotonTemplate -JSONPath .\photon.json .EXAMPLE New-PhotonTemplate -JSONPath .\photon.json -LogFile .\photon.log #> [cmdletbinding()] param( [Parameter(Mandatory = $true)] [string]$JSONPath, [string]$LogFile ) function Write-ToLog { [CmdletBinding()] param( [string]$Category, [string]$Text ) $timeStamp = (Get-Date).ToString('yyyyMMddThhmmss') $script = Split-Path -Path $myInvocation.ScriptName -Leaf $user = $env:UserName $line = "$timeStamp - $script - $user - [$Category] $Text" if ($LogFile) { $line | Out-File -FilePath $LogFile -Append } else { $line } } function Invoke-VMReboot { [CmdletBinding()] param( [string]$VMName ) $vmGuest = Get-VMGuest -VM $VMName Stop-VMGuest -VM $vm -Confirm:$false | Out-Null while ($vmGuest.VM.PowerState -ne 'PoweredOff') { Start-Sleep 1 $vmGuest = Get-VMGuest -VM $vmGuest.VM } $vmGuest = Start-VM -VM $vmGuest.VM -Confirm:$false | Get-VMGuest while ($vmGuest.VM.PowerState -ne 'PoweredOn' -or -not $vmGuest.ExtensionData.GuestOperationsReady) { Start-Sleep 1 $vmGuest = Get-VMGuest -VM $vmGuest.VM } } # Get Parameters $paramDataJSON = Get-Content -Path $JSONPath | Out-String $paramData = ConvertFrom-Json -InputObject $paramDataJSON # Determine location for template $obj = Get-Inventory -Name $paramData.vSphere.VMHost if ($obj -is [VMware.VimAutomation.ViCore.Types.V1.Inventory.Cluster]) { $obj = Get-VMHost -Location $obj | Get-Random } $esx = $obj $dsc = Get-DatastoreCluster -Name $paramData.vSphere.Storage -ErrorAction SilentlyContinue if ($dsc) { $ds = Get-Datastore -RelatedObject $dsc | Get-Random } else { $ds = Get-Datastore -Name $paramData.vSphere.Storage } # Clean up eventual artifacts if ($vm = Get-VM -Name $paramData.Template.TemplateName -ErrorAction SilentlyContinue) { if ($vm.PowerState -eq [VMware.VimAutomation.ViCore.Types.V1.Inventory.PowerState]::PoweredOn) { Stop-VM -VM $vm -Confirm:$false | Out-Null } Remove-VM -VM $vm -Confirm:$false -DeletePermanently Write-ToLog -Category Info -Text "Removed VM $($vm.Name)" } if ($template = Get-Template -Name $paramData.Template.TemplateName -ErrorAction SilentlyContinue) { Remove-Template -Template $template -DeletePermanently -Confirm:$false Write-ToLog -Category Info -Text "Removed Template $($template.Name)" } # Import Appliance $ovfParm = Get-OvfConfiguration -Ovf $paramData.vSphere.OvaPath $ovfParm.NetworkMapping.None.Value = $paramData.Network.PortGroup $sVApp = @{ Name = $paramData.Template.TemplateName Source = $paramData.vSphere.OvaPath OvfConfiguration = $ovfParm VMHost = $esx Datastore = $ds DiskStorageFormat = [VMware.VimAutomation.ViCore.Types.V1.VirtualDevice.VirtualDiskStorageFormat]::Thin Confirm = $false } if($paramData.Template.Folder){ $sVApp.Add('InventoryLocation',(Get-FolderByPath -Path $paramData.Template.Folder)) } Write-ToLog -Category Info -Text "Importing vApp..." $vm = Import-VApp @sVApp Write-ToLog -Category Info -Text "Imported vApp $($sVApp.Name)" # Configure VM $vm = Get-VM -Name $paramData.Template.TemplateName $sSet = @{ VM = $vm NumCpu = $paramData.Template.NumCpu MemoryGB = $paramData.Template.MemoryGB Notes = $paramData.Template.TemplateNote.Replace('#timestamp#', (Get-Date -Format 'dd/MM/yyyy HH:mm')) Confirm = $false } Set-VM @sSet > $null Get-HardDisk -VM $vm | Set-HardDisk -CapacityGB $paramData.Template.HarddiskGB -Confirm:$false > $null Get-FloppyDrive -VM $vm | Remove-FloppyDrive -Confirm:$false > $null Write-ToLog -Category Info -Text "Configured VM $($vm.Name)" Start-VM -VM $vm > $null Write-ToLog -Category Info -Text "Power on VM $($vm.Name)" while ($vm.ExtensionData.Guest.ToolsRunningStatus -ne [VMware.Vim.VirtualMachineToolsRunningStatus]::guestToolsRunning -or $vm.ExtensionData.Runtime.PowerState -ne [VMware.Vim.VirtualMachinePowerState]::poweredOn) { Start-Sleep 2 $vm.ExtensionData.UpdateViewData() } Write-ToLog -Category Info -Text "VM $($vm.Name) is powered on" # Change Photon OS default root password # Thanks to William Lam for his Set-VMKeystrokes function # See https://www.virtuallyghetto.com/2017/09/automating-vm-keystrokes-using-the-vsphere-api-powercli.html Write-ToLog -Category Info -Text "Change password for user $($paramData.Account.User)" Set-VMKeystrokes -VMName $VM -StringInput $paramData.Account.User -ReturnCarriage $true | Out-Null Set-VMKeystrokes -VMName $VM -StringInput $paramData.Account.OldPassword -ReturnCarriage $true | Out-Null Set-VMKeystrokes -VMName $VM -StringInput $paramData.Account.OldPassword -ReturnCarriage $true | Out-Null Set-VMKeystrokes -VMName $VM -StringInput $paramData.Account.NewPassword -ReturnCarriage $true | Out-Null Set-VMKeystrokes -VMName $VM -StringInput $paramData.Account.NewPassword -ReturnCarriage $true | Out-Null Set-VMKeystrokes -VMName $VM -StringInput "exit" -ReturnCarriage $true | Out-Null $vm = Get-VM -Name $paramData.Template.TemplateName # Run all customisation scripts foreach ($code in $paramData.Template.CustomisationCode) { if ($code -eq 'reboot') { Write-ToLog -Category Info -Text "Rebooting VM $($vm.Name)..." Invoke-VMReboot -VMName $vm.Name Write-ToLog -Category Info -Text "Rebooted VM $($vm.Name)" } else { $codeObj = $paramData.Code.Where{$_.Name -eq $code} $sInvoke = @{ VM = $vm ScriptType = 'Bash' ScriptText = $ExecutionContext.InvokeCommand.ExpandString(($codeObj.Script -join "`r`n")) GuestUser = $paramData.Account.User GuestPassword = ConvertTo-SecureString -String $paramData.Account.NewPassword -AsPlainText -Force GuestOSType = 'Linux' } if($codeObj.Environment){ $sInvoke.Add('ScriptEnvironment',$codeObj.Environment.foreach{$ExecutionContext.InvokeCommand.ExpandString($_)}) } Write-ToLog -Category Info -Text "Running $code" $result = Invoke-VMScriptPlus @sInvoke if ($LogFile) { $result | Out-File -FilePath $LogFile -Append } else { $result } } } # Create Template if ($paramData.Template.CreateTemplate) { $vm = Get-VM -Name $paramData.Template.TemplateName if ($vm.PowerState -eq [VMware.VimAutomation.ViCore.Types.V1.Inventory.PowerState]::PoweredOn) { Write-ToLog -Category Info -Text "Stopping VM $($vm.Name) ..." Shutdown-VMGuest -VM $vm -Confirm:$false > $null while ($vm.PowerState -ne [VMware.VimAutomation.ViCore.Types.V1.Inventory.PowerState]::PoweredOff) { Start-Sleep 3 $vm = Get-VM -Name $paramData.Template.TemplateName } Write-ToLog -Category Info -Text "VM $($vm.Name) stopped" } Write-ToLog -Category Info -Text "Convert VM $($vm.Name) to Template" Set-vm -VM $vm -ToTemplate -Confirm:$false > $null } } |
Annotations
Line 36-54: An inline function to have all messages in the same format.
Line 56-75: A reboot the guest OS function. Called when the “reboot” instruction is encountered. See later.
Line 79-80: These lines read the JSON file and convert the data to a PowerShell object
Line 84-88: The vSphere.VMHost field can contain a cluster or an ESXi node. These lines handle those options. In case of a cluster, the function selects a random ESXi node from the cluster.
Line 90-96: The vSphere.Storage field can contain a DatastoreCluster or a Datastore. These lines handle those options. In case of a datastorecluster, the function selects a random datastore from the datastorecluster.
Line 100-110: These lines check if there is already a Template or a VirtualMachine with a name as specified in Template.TemplateName. If there is, the Template or VirtualMachine are removed.
Line 114-130: A straight-forward method to import the Photon OVA as defined in vSphere.OvaPath.
Line 134-146: Further HW configuration of the VM
Line 148-156: The new VM is powered on, and the function waits till the VMware Tools are responding
Line 162-170: The function changes the root password with the new password defined in Account.NewPassword. For this action the code uses the Set-VMKeystrokes function. William describes this ingenious method in his Automating VM keystrokes using the vSphere API & PowerCLI post, well worth a read!
Line 176-204: The code now runs all the customisation script that are defined in Template.CustomisationCode. The actual customisation scripts are defined in the Code section of the JSON file.
Line 177-182: With reserved name “reboot” you can request a reboot of the guest OS. This is executed in the sequence order with the customisation scripts as defined in the Template.CustomisationCode field.
Line 187,193: With the ExpandString method the script expands all $paramData occurrances in the customisation scripts with the actual values. This allows us to keep the customisation script general and not coded for a specific instance.
Line 192-194: If the customisation script contains environment variables in the Code.Environment field, these are environment variables are passed along with the customisatoin script to the Invoke-VMScriptPlus function.
Line 208-223: Based on the Template.CreateTemplate value (true or false) the VM is converted into a Template. One reason not to convert the VM to a Template, could be that your debugging one or more of the customisation scripts.
Sample Run
Now we have everything in place to create a Photon 2.0 template, based on the configuration settings and customisation scripts in our JSON file. Since it can be useful to review the output, especially of the customisation scripts, we use the LogFile parameter to specify a file where the function can write the output.
|
1 |
New-PhotonTemplate -JSONPath .\LabParams.json -LogFile C:\Temp\photon-template.log |
When we call the New-PhotonTemplate with the LogFile parameter, there will be no regular output on the PowerShell console.
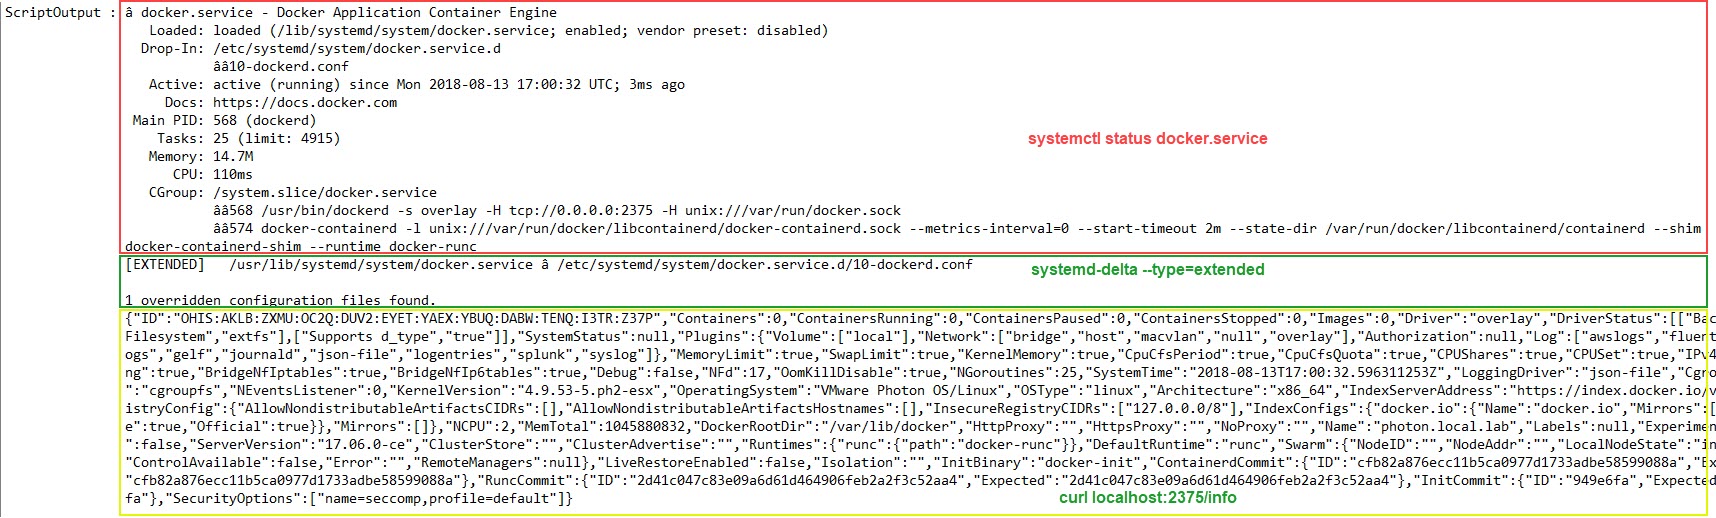
The logfile contains useful information, especially if we add statements to our customisation scripts to retrieve information on the components. This excerpt shows some information that was obtained in the docker customisation script.
When all goes well, the New-PhotonTemplate will have created a Template with the Photon 2.0 guest OS.
Known Issues
open-vm-tools
When you use one of the customisation scripts to upgrade the Photon components (command tdnf upgrade), and the open-vm-tools are in there, the returned information of the script might not be complete. You will miss the ScriptOutput and the ExitCode.
As a workaround, upgrade the open-vm-tools separately before upgrading any of the other components.
Files
Attached to this post are some files that will help you get started. There is an empty, skeleton JSON file and two Photon customisation scripts, one for the network and one for docker.
Next
In Part 2 of this series I will be showing how the Template we just created, can be used to roll out any number of VMs.
Enjoy!

synth3tk
I had an issue with the password change happening way too quickly, causing it to fail. I added in one-second sleeps to mitigate it.
LucD
Strange, I never experienced that.
You might want to try to update the While-loop before sending the keystrokes with this one.
while (($vm.ExtensionData.Guest.ToolsRunningStatus -ne [VMware.Vim.VirtualMachineToolsRunningStatus]::guestToolsRunning -or

$vm.ExtensionData.Runtime.PowerState -ne [VMware.Vim.VirtualMachinePowerState]::poweredOn) -and

-not $vm.ExtensionData.Guest.GuestOperationsReady) {

Start-Sleep 2

$vm.ExtensionData.UpdateViewData()

}
Let me know if that helps.
LucD
That function is another post on my blog, see Folder By Path.
But I’ll update the post, thanks for noticing that.
Reginaldo Tunisi
Luc.. Nice script! Can i make a suggestion for the password session? You could use your invoke-vmscriptplus with
echo $newpassword | passwd root –stdin (passing $oldpassword as credentials).. This way you change the root password without console interaction…
LucD
Hi Reginaldo,
When you connect to the Photon VM, it prompts immediately to change the password. There is no access to the shell at that point I’m afraid.