
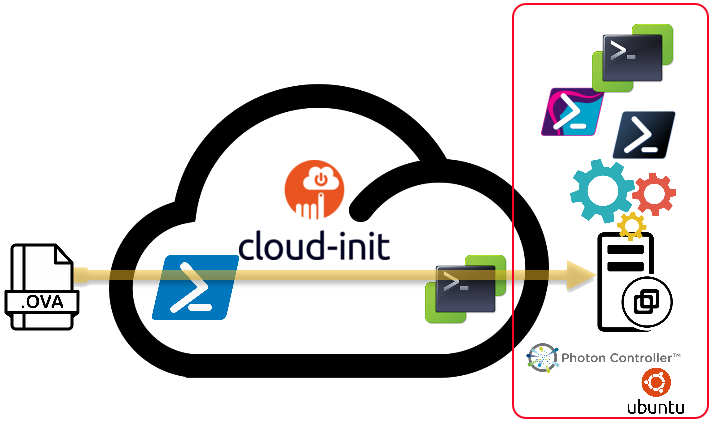
For now, the second to last part in this series. And although technically not a ‘real‘ cloud-init post, I consider it related to Part 1, Part 2 and Part3 in this series. In this post I’ll show how you can run scripts on these ‘cattle‘ stations we just deployed.
Introduction
The purpose of this post is quite straightforward. How can we use the ‘cattle‘ stations we created to run our PowerShell/PowerCLI scripts?
Since all the stations we deployed with cloud-init come with the VMware Tools installed, we can use the GuestOperations, and all cmdlets and functions based on these API, to communicate with the Guest OS.
In practice, this means that the Invoke-VMScript cmdlet should be used. But unfortunately, the current implementation of that cmdlet has some issues with multi-line bash scripts (and a few other problems).
To avoid those issues I have written my Invoke-VMScriptPlus function. Besides fixing the above-mentioned issues, it also adds some extra features that come in handy, as you will notice later on in this post.
Local PowerShell Script
Ubuntu
We start simple. In this post, we will show how you can run your PowerShell scripts locally inside the guest OS of the stations we deployed with cloud-init.
Note that in the examples I use a VICredentialStoreItem to fetch the credentials for the target guest OS. As you might know by now, the VICredentialStoreItem cmdlets are only supported on a Windows platform (since they use the DPAPI methods).
Any which way you get those credentials will of course work. But I consider that not to be part of the cloud-init series of posts.
Back to the task at hand, let’s use a simple example to start.
|
1 2 3 4 5 6 7 8 9 10 11 12 13 14 15 |
$vmName = 'ubuntubionicps' $code = @' $PSVersionTable '@ $credItem = Get-VICredentialStoreItem -Host $vmName $cred = New-Object System.Management.Automation.PSCredential ($credItem.User, (ConvertTo-SecureString $credItem.Password -AsPlainText -Force)) $sInvoke = @{ VM = $vmName GuestCredential = $cred ScriptType = 'powershellv6' ScriptText = $code } Invoke-VMScriptPlus @sInvoke |
Nothing too complicated at first sight. We sent a PowerShell script to an Ubuntu box. But we do seem to get an error.

That doesn’t really give us a lot of useful information on what is going on. My first step in analysing such non-obvious errors is to add some verbosity.
|
1 2 3 4 5 6 7 8 9 10 11 12 13 14 15 16 |
$vmName = 'ubuntubionicps' $code = @' $PSVersionTable '@ $credItem = Get-VICredentialStoreItem -Host $vmName $cred = New-Object System.Management.Automation.PSCredential ($credItem.User, (ConvertTo-SecureString $credItem.Password -AsPlainText -Force)) $sInvoke = @{ VM = $vmName GuestCredential = $cred ScriptType = 'powershellv6' ScriptText = $code Verbose = $true } Invoke-VMScriptPlus @sInvoke |
And now we get some more clues. Btw, I only listed part of the verbose output that helps in analysing the issue.
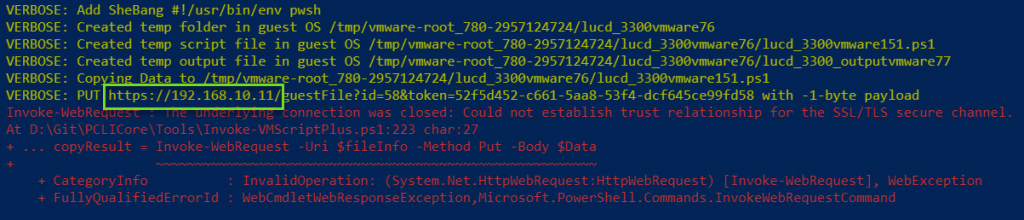
The error comes immediately after the PUT where we copy the script text to a file in the guest OS. Since SSL/TLS secure channel is mentioned, let’s have a look at the certificate that is used on that ESXi node.
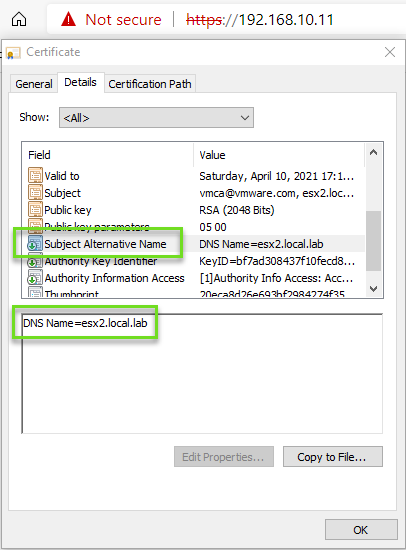
And there is our answer. The certificate used on the ESXi node in question only contains a SAN for the FQDN, not the IP address.
Since this is something I watched happen at several sites, I added the NoIPinCert switch to the Invoke-VMScriptPlus function. When that switch is set, the function will take the IP address and replace it by the FQDN. This, of course, assumes that DNS resolution is working!
|
1 2 3 4 5 6 7 8 9 10 11 12 13 14 15 16 |
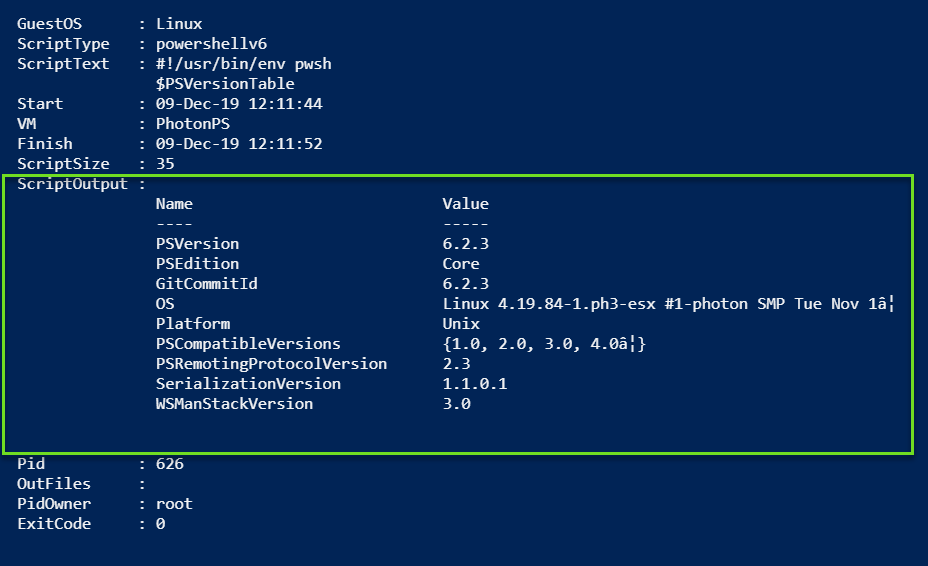
$vmName = 'ubuntubionicps' $code = @' $PSVersionTable '@ $credItem = Get-VICredentialStoreItem -Host $vmName $cred = New-Object System.Management.Automation.PSCredential ($credItem.User, (ConvertTo-SecureString $credItem.Password -AsPlainText -Force)) $sInvoke = @{ VM = $vmName GuestCredential = $cred ScriptType = 'powershellv6' ScriptText = $code NoIPinCert = $true } Invoke-VMScriptPlus @sInvoke |
And now we get the result we were expecting.

Don’t mind the properties beside ScriptOutput and the funny characters in ScriptOutput for now. We’ll get to that later.
Photon
And for good measure, let’s run the same on a Photon station.
|
1 2 3 4 5 6 7 8 9 10 11 12 13 14 15 16 |
$vmName = 'photonps' $code = @' $PSVersionTable '@ $credItem = Get-VICredentialStoreItem -Host $vmName $cred = New-Object System.Management.Automation.PSCredential ($credItem.User, (ConvertTo-SecureString $credItem.Password -AsPlainText -Force)) $sInvoke = @{ VM = $vmName GuestCredential = $cred ScriptType = 'powershellv6' ScriptText = $code NoIPinCert = $true } Invoke-VMScriptPlus @sInvoke |
Confirmed, also a success with a Photon guest OS.
Local PowerCLI Script
So we can run PowerShell script, but what about VMware PowerCLI? I want to be able to run my PowerCLI script on such a station.
Since we need to have the modules installed, before we can actually use any of the PowerCLI cmdlets, let’s include that in our test script.
|
1 2 3 4 5 6 7 8 9 10 11 12 13 14 15 16 17 18 19 20 21 22 23 24 25 26 27 28 29 30 31 32 33 34 35 36 37 38 |
$vmName = 'ubuntubionicps' $code = @' `$ProgressPreference = "SilentlyContinue" if(-not (Get-Module -Name 'VMware.PowerCLI' -ListAvailable)){ Install-Module -Name VMware.PowerCLI -Scope CurrentUser -AllowClobber -Force | Out-Null } `$WarningPreference = 'SilentlyContinue' `$sConf = @{ InvalidCertificateAction = 'Ignore' ParticipateInCeip = `$false DisplayDeprecationWarnings = `$false Scope = 'User' Confirm = `$false } Set-PowerCLIConfiguration @sConf | Out-Null Connect-VIServer -Server $vcsaName -User $user -Password $pswd | Out-Null Get-VMHost | Select Name,Version,PowerState,NumCpu,MemoryTotalGB | ConvertTo-Csv -NotypeInformation -UseCulture Disconnect-VIServer -Server $vcsaName -Confirm:`$false '@ $vcsaName = 'vcsa.local.lab' $credVCSA = Get-VICredentialStoreItem -Host $vcsaName $user = $credVCSA.User $pswd = $credVCSA.Password $credVM = Get-VICredentialStoreItem -Host $vmName $cred = New-Object System.Management.Automation.PSCredential ($credVM.User, (ConvertTo-SecureString $credVM.Password -AsPlainText -Force)) $sInvoke = @{ VM = Get-VM -Name $vmName GuestCredential = $cred ScriptType = 'powershellv6' ScriptText = $ExecutionContext.InvokeCommand.ExpandString($code) NoIPinCert = $true } $result = Invoke-VMScriptPlus @sInvoke $result.ScriptOutput | ConvertFrom-Csv -UseCulture | Format-Table -AutoSize |
Annotations
Line 3-20: The script we are executing inside the target guest OS.
Line 4: Since we are using variable substitution on the script text later on (see line 34), we need to escape the dollar signs in the variables we do NOT want to be substituted. This is done through a backtick before the dollar sign.
Line 4: We mute the progress information. This to avoid unnecessary output during the installation of the PowerCLI modules.
Line 5-7: A simple test to check if the PowerCLI modules are installed or not. If they aren’t, the script will install them. Note that since we are running our scripts locally in the guest OS, once the modules are installed they will stay installed for any future script runs. If you want to start fresh for each script, you will have to deploy a new instance. The ‘cattle’ principle!
Line 9-16: We want our script to be as ‘silent’ as possible, that is why we change some PowerCLI configuration settings. Note that disabling the CEIP participation in this example script is a personal choice and you can leave it on without any impact on your script(s).
Line 18: This sample code will output results in CSV format (ConvertTo-Csv) to the console. This will make it easy for the calling script to handle the returned data.
Line 34: Instead of hard-coding specific values in the script we send to the target station, we use variable substitution to fill in the values at the moment we send the script to the target station. This is done through the ExpandString method.
Line 38: This show how easy it is to receive the result when we have the data converted into a well-known format (CSV in this case).
The script results in the following. Instead of Format-Table we could have used any other cmdlet that sends the result to a file, or as the body of an email…
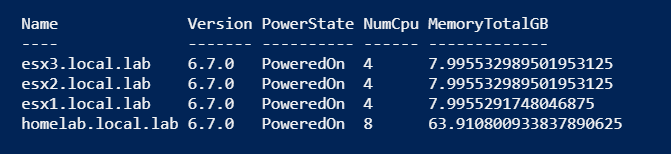
The same script runs in the same way on Ubuntu and Photon. And in both cases produces the same result.
Your Existing Scripts
A question I heard several times when I presented the concept of ‘cattle’ stations at conferences, was “What will happen with my existing scripts?“.
As it turns out, you will not have to do a lot. In most cases, you will able to just take your script and with a bit of PowerShell magic, you can use it in this setup.
Let’s take this simple script as an example. And yes, this is exactly the same code as ran before. But we’re demonstrating the concept.
We save the following lines as Sample-PCLI-Script.ps1, and it is representative for all your existing scripts.
|
1 |
Get-VMHost | Select Name, Version, PowerState, NumCpu, MemoryTotalGB |<br>ConvertTo-Csv -NotypeInformation -UseCulture |
We now need to use a slightly different script to submit this to our target station.
|
1 2 3 4 5 6 7 8 9 10 11 12 13 14 15 16 17 18 19 20 21 22 23 24 25 26 27 28 29 30 31 32 33 34 35 36 37 38 39 40 41 42 43 |
$vmName = 'ubuntubionicps' $prefix = @' `$ProgressPreference = "SilentlyContinue" if(-not (Get-Module -Name 'VMware.PowerCLI' -ListAvailable)){ Install-Module -Name VMware.PowerCLI -Scope CurrentUser -AllowClobber -Force | Out-Null } `$WarningPreference = 'SilentlyContinue' `$sConf = @{ InvalidCertificateAction = 'Ignore' ParticipateInCeip = `$false DisplayDeprecationWarnings = `$false Scope = 'User' Confirm = `$false } Set-PowerCLIConfiguration @sConf | Out-Null Connect-VIServer -Server $vcsaName -User $user -Password $pswd | Out-Null '@ $code = Get-Content -Path .\Sample-PCLI-Script.ps1 $suffix = @' Disconnect-VIServer -Server $vcsaName -Confirm:`$false '@ $vcsaName = 'vcsa.local.lab' $credVCSA = Get-VICredentialStoreItem -Host $vcsaName $user = $credVCSA.User $pswd = $credVCSA.Password $credVM = Get-VICredentialStoreItem -Host $vmName $cred = New-Object System.Management.Automation.PSCredential ($credVM.User, (ConvertTo-SecureString $credVM.Password -AsPlainText -Force)) $sInvoke = @{ VM = Get-VM -Name $vmName GuestCredential = $cred ScriptType = 'powershellv6' ScriptText = ($ExecutionContext.InvokeCommand.ExpandString($prefix) + "`n$code`n" + $ExecutionContext.InvokeCommand.ExpandString($suffix)) NoIPinCert = $true } $result = Invoke-VMScriptPlus @sInvoke $result.ScriptOutput $result.ScriptOutput | ConvertFrom-Csv -UseCulture | Format-Table -AutoSize |
Annotations
Line 3-18: Under the $prefix variable we store the ‘fixed’ code that prepares the environment. Just as the same part in the previous example.
Line 20: This is where we read our existing script into a variable.
Line 22-24: The $suffix variable contains the ‘fixed’ closing part of the code.
Line 38: We compose the ScriptText from the three variables $preifx, $code and $suffix. Note that for the $code variable we don’t need to do any variable substitution.
Will this work for all your existing scripts?
Probably not, you will need to verify if there are for example any Connect- and/or DisConnect-VIServer lines in your script.
Infile and Outfile
In the previous examples, we always send the result back over the standard output. This is not a feasible solution in all cases. What for example when your script produces multiples outputs? And what when you need to read data as input for your script?
For all those reasons I added the InFile and OutFile parameters to Invoke-VMScriptPlus. For more details see my Invoke-VMScriptPLus V3 post.
The following demonstrates, in a simple way, how you can use those InFile and OutFile parameters to run your scripts on a ‘cattle’ station.
This is our original script, saved as Sample-PCLI-Script4.ps1.
|
1 2 3 4 5 |
$esxName = Import-Csv -Path .\esxnames.csv | Select -ExpandProperty Name Get-VMHost -Name $esxName | Select Name, NumCpu, Version | Export-Csv -Path .\report.csv -UseCulture -NoTypeInformation Write-Host "Script completed" |
The esxnames.csv file contains the following.
|
Name
|
| esx1.local.lab |
| esx3.local.lab |
Our calling script. Notice the use of the InFile and OutFile parameters on lines 40 and 41.
|
1 2 3 4 5 6 7 8 9 10 11 12 13 14 15 16 17 18 19 20 21 22 23 24 25 26 27 28 29 30 31 32 33 34 35 36 37 38 39 40 41 42 43 44 45 |
$vmName = 'ubuntubionicps' $prefix = @' `$ProgressPreference = "SilentlyContinue" if(-not (Get-Module -Name 'VMware.PowerCLI' -ListAvailable)){ Install-Module -Name VMware.PowerCLI -Scope CurrentUser -AllowClobber -Force | Out-Null } `$WarningPreference = 'SilentlyContinue' `$sConf = @{ InvalidCertificateAction = 'Ignore' ParticipateInCeip = `$false DisplayDeprecationWarnings = `$false Scope = 'User' Confirm = `$false } Set-PowerCLIConfiguration @sConf | Out-Null Connect-VIServer -Server $vcsaName -User $user -Password $pswd | Out-Null '@ $code = Get-Content -Path .\Sample-PCLI-Script4.ps1 $suffix = @' Disconnect-VIServer -Server $vcsaName -Confirm:`$false '@ $vcsaName = 'vcsa.local.lab' $credVCSA = Get-VICredentialStoreItem -Host $vcsaName $user = $credVCSA.User $pswd = $credVCSA.Password $credVM = Get-VICredentialStoreItem -Host $vmName $cred = New-Object System.Management.Automation.PSCredential ($credVM.User, (ConvertTo-SecureString $credVM.Password -AsPlainText -Force)) $sInvoke = @{ VM = Get-VM -Name $vmName GuestCredential = $cred ScriptType = 'powershellv6' ScriptText = ($ExecutionContext.InvokeCommand.ExpandString($prefix) + "`n$($code -join "`n")`n" + $ExecutionContext.InvokeCommand.ExpandString($suffix)) GuestOSType = 'Linux' InFile = '.\esxnames.csv' OutFile = 'report.csv' NoIPinCert = $true } $result = Invoke-VMScriptPlus @sInvoke $result.ScriptOutput |
The output from our script is now just a message we wrote in the original script.

But the result can now be found in the file report.csv.
|
Name
|
NumCpu | Version | |
| esx1.local.lab | 4 | 6.7.0 | |
| esx3.local.lab | 4 | 6.7.0 |
Conclusion
I hope the previous sections have shown that it doesn’t require rocket science to run your scripts on instances deployed with the help of cloud-init.
Will the above methods always work for your scripts?
Probably not, but it shouldn’t be too difficult to make them work.
I’m always interested to hear about cases that at first can’t be run on ‘cattle’ stations. If you think you have such a case, let me know through the comments.
Enjoy!