
One of the important DevOps adagios in my book is “Treat your servers as cattle, not as pets”. Meaning that you roll out your stations when you need them, use them and throw them away after you used them. This series of posts will document one such way of deploying such ‘cattle’ stations. The method is named cloud-init.

In this first part, we will introduce cloud-init and how you can use it from your PowerShell/PowerCLI scripts. Since the Ubuntu distribution is very popular, on-premises and in the cloud, this introduction will focus on that distro to demonstrate the concept. In the following parts, we will tackle Photon, containers and how to run your scripts on these stations.
Before diving into the technical stuff, first a reminder why we should treat our servers as cattle.
A list with some of the major arguments (at least for me).
- No maintenance required when using the latest distributions. Meaning no long-running updates and security patches before usage.
- No “less than 5% used” machines anymore in your environment.
- No risk of system tattooing from any previous usage.
- An easy way to test new versions of your scripts, the OS, PowerShell and PowerCLI.
Ingredients
To use cloud-init, the requirements, in the cases we will handle here, are minimal.
- An OVA image that is configured to use cloud-init
- A datasource, which is the configuration data provided by the user to the cloud-init process, and which defines how the resulting station will be configured.
- A cloud, in it’s broadest sense, to run the VM. From the cloud-init documentation “… all major public cloud providers, provisioning systems for private cloud infrastructure, and bare-metal installations.”
- A script to trigger and control it all.
Canonical, the company behind Ubuntu, maintains a document, named Cloud Instance Initialisation with cloud-init, that has a schematic that captures the cloud-init process perfectly.
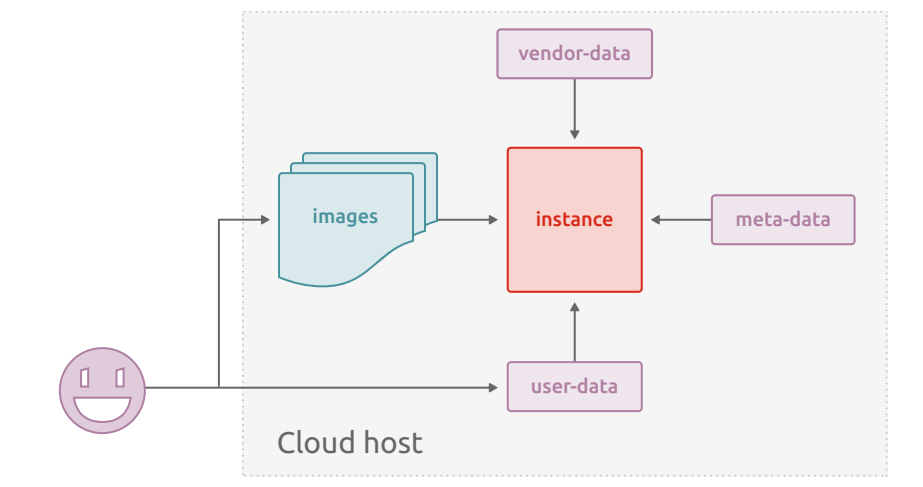
If we annotate and update this schema for the usage we have in mind, it becomes like this.
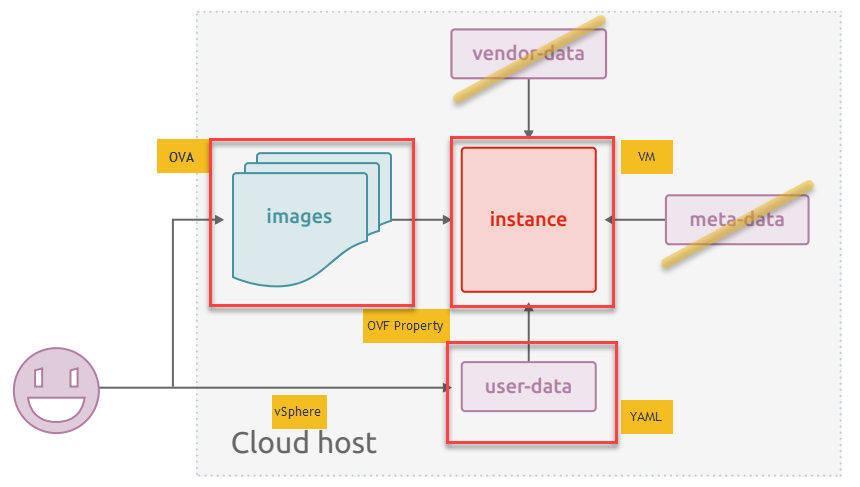
The OVA File
Since our target cloud platform in this series is a vSphere environment, we will use OVA files as the source for the VM(s) we are going to deploy.
The Ubuntu OVA image that we will be using in this post is for Ubuntu Server 18.04 LTS, aka Bionic Beaver.
This OVA image allows using the OVFProperties as the datasource. Note that the user-data we pass in this way needs to be Base64 encoded.
The User-data
As mentioned in the previous section, in this Ubuntu image we will use the OVFProperties as the datasource for our user-data.
The content of the user-data is provided to the script as a YAML file. The syntax for such a file and the available is defined in the cloud-init Documentation.
The following is the sample YAML file we will use in the rest of this post.
|
1 2 3 4 5 6 7 8 9 10 11 12 13 14 15 16 17 18 19 20 21 22 23 24 25 26 27 28 29 30 31 32 33 34 35 36 37 38 39 40 41 42 43 44 45 46 47 48 49 50 51 52 53 54 55 56 57 58 59 60 61 62 63 |
#cloud-config hostname: ubuntubionic fqdn: ubuntubionic.local.lab write_files: - path: /etc/netplan/50-cloud-init.yaml content: | network: version: 2 ethernets: ens192: addresses: [192.168.10.79/24] gateway4: 192.168.10.1 dhcp6: false nameservers: addresses: - 192.168.10.2 - 192.168.10.3 search: - local.lab dhcp4: false optional: true - path: /etc/sysctl.d/60-disable-ipv6.conf owner: root content: | net.ipv6.conf.all.disable_ipv6=1 net.ipv6.conf.default.disable_ipv6=1 runcmd: - netplan --debug apply - sysctl -w net.ipv6.conf.all.disable_ipv6=1 - sysctl -w net.ipv6.conf.default.disable_ipv6=1 - apt-get -y update - add-apt-repository universe - apt-get -y clean - apt-get -y autoremove --purge timezone: Europe/Brussels system_info: default_user: name: default-user lock_passwd: false sudo: ["ALL=(ALL) NOPASSWD:ALL"] disable_root: false ssh_pwauth: yes users: - default - name: luc gecos: LucD lock_passwd: false groups: sudo, users, admin shell: /bin/bash sudo: ['ALL=(ALL) NOPASSWD:ALL'] chpasswd: list: | default-user:$6$aPp//e2ueP$ETEXcAhAyQuJ4qNCbqxmmSYGZbg2wFwpP/YITvoXdgxwZBnf32drePKi2OIn5fLqtH5pHO03yRdPXK3ToLG6b0 luc:$6$kW1WwJ2K$M6415du1BZd.qt92SvR6X.RuyDhEZmgR4hz4NcKH9XHn2850Vc6zHpubXM6uUeqMUaJQ740ogROB74gfBEhn9. root:$6$Js9CVr06$br9qf0VxuBsdY7Vtg/0pk9jLlycYBDLVsvbKwLDleCK7dSDheOxWaFOWdjkiqSPRrWG./N8V5RgCVwugZGnTc1 expire: false package_upgrade: true package_reboot_if_required: true power_state: delay: now mode: reboot message: Rebooting the OS condition: if [ -e /var/run/reboot-required ]; then exit 0; else exit 1; fi |
Annotations
Line 1: the user-data file always has to start with the line ‘# cloud-config’
Line 2-3: These lines follow the regular YAML syntax of key-value entries. The lines defines the hostname and the FQDN that the instance will get.
Line 4-26: The write-files section instructs cloud-init to create files, with the specified properties and content on the instance. In this example file the files are used to define a static IPv4 address and to disable IPv6. Which files need to be used is dependent on the OS that runs in the VM. Note that this example will use netplan for the network configuration.
Line 27-34: The runcmd section defines commands that will run on the instance during the first boot of the guest OS. In this example the commands are used to activate the network (it uses netplan), set some variables and set and update the application repositories.
Line 35: This line defines which timezone needs to be configured.
Line 36-40: An Ubuntu image comes configured with a default user. In the system_info section, the settings for this default user are specified.
Line 43-50: The users section allows to define additional users on the instance. Note that the default user needs to come first in this list.
Line 51-56: The chpasswd allows you to change and/or set the passwords for the users. The required format and how these entries are created will be discussed in one of the following sections.
Line 57-58: These lines request an upgrade of the packages present on the instance. And perform a reboot when one of the package upgrades would require that.
Line 59-63: The power-state section instructs cloud-init in which state the instance shall be left after cloud-init completes. In this example, the system is rebooted on condition that a specific file exists. This file is created by cloud-init when it has decided that a reboot of the instance is required.
Password encoding
In user-data, there are several places where a password can be provided. The value needs to be the hash of the password, not the password itself. With the help of an existing Linux box (UbuntuWork in this case), I use the following script to create such SHA-512 encoded password hashes. The script uses the mkpasswd command to generate the hash.
Automation rules!
|
1 2 3 4 5 6 7 8 9 10 11 12 13 14 15 16 17 18 19 20 21 22 23 24 25 26 |
function Get-PasswordHash { param( [String]$VMName, [String]$GuestUser, [String]$GuestPassword, [String]$Password ) $sInvoke = @{ VM = $VMName ScriptType = 'bash' ScriptText = "mkpasswd -m SHA-512 $Password" GuestUser = $GuestUser GuestPassword = $GuestPassword } (Invoke-VMScript @sInvoke).ScriptOutput.Trim("`n") } $sHash = @{ VM = 'UbuntuWork' GuestUser = 'root' GuestPassword = 'VMware1!' Password = 'VMware1!' } Get-PasswordHash @sHash |
This returns something like this.

A word of warning, such hashed password are not super-safe. A decent password cracker with sufficient compute power and a good wordlist can most probably crack this in less than one minute.
The Script
|
1 2 3 4 5 6 7 8 9 10 11 12 13 14 15 16 17 18 19 20 21 22 23 24 25 26 27 28 29 30 31 32 33 34 35 36 37 38 39 40 41 42 43 44 45 46 47 48 49 50 51 52 53 54 55 56 57 58 59 60 61 62 63 64 65 66 67 68 69 70 71 72 73 74 75 76 77 78 79 80 81 82 83 84 85 86 87 88 89 90 91 92 93 94 95 96 97 98 99 100 101 102 103 |
function Install-CloudInitVM { <# .SYNOPSIS Deploy a VM from an OVA file and use cloud-init for the configuration .DESCRIPTION This function will deploy an OVA file. The function transfer the user-data to the cloud-init process on the VM with one of the OVF properties. .NOTES Author: Luc Dekens Version: 1.0 05/12/19 Initial release .PARAMETER OvaFile Specifies the path to the OVA file .PARAMETER VmName The displayname of the VM .PARAMETER ClusterName The cluster onto which the VM shall be deployed .PARAMETER DsName The datastore on which the VM shall be deployed .PARAMETER PgName The portgroupname to which the VM shall be connected .PARAMETER CloudConfig The path to the YAML file containing the user-data .PARAMETER Credential The credentials for a user in the VM's guest OS .EXAMPLE $sCloudInitVM = @{ OvaFile = '.\bionic-server-cloudimg-amd64.ova' VmName = $vmName ClusterName = $clusterName DsName = $dsName PgName = $pgName CloudConfig = '.\user-data.yaml' Credential = $cred } Install-CloudInitVM @sCloudInitVM #> [cmdletbinding()] param( [string]$OvaFile, [string]$VmName, [string]$ClusterName, [string]$DsName, [string]$PgName, [string]$CloudConfig, [PSCredential[]]$Credential ) $waitJob = (Get-Command -Name .\Wait-Job.ps1).ScriptBlock $userData = Get-Content -Path $CloudConfig -Raw Write-Verbose "$(Get-Date -Format 'HH:mm:ss.fff') - Starting deployment of $vmName" $start = Get-Date $vm = Get-VM -Name $vmName -ErrorAction SilentlyContinue if ($vm) { Write-Verbose "$(Get-Date -Format 'HH:mm:ss.fff') - Cleaning up" if ($vm.PowerState -eq 'PoweredOn') { Stop-VM -VM $vm -Confirm:$false | Out-Null } Remove-VM -VM $vm -DeletePermanently -Confirm:$false } $ovfProp = Get-OvfConfiguration -Ovf $ovaFile $ovfProp.Common.user_data.Value = [System.Convert]::ToBase64String([System.Text.Encoding]::UTF8.GetBytes($userData)) $ovfProp.NetworkMapping.VM_Network.Value = $pgName $sApp = @{ Source = $ovaFile Name = $vmName Datastore = Get-Datastore -Name $dsName DiskStorageFormat = 'Thin' VMHost = Get-Cluster -Name $clusterName | Get-VMHost | Get-Random OvfConfiguration = $ovfProp } Write-Verbose "$(Get-Date -Format 'HH:mm:ss.fff') - Importing OVA" $vm = Import-VApp @sApp Write-Verbose "$(Get-Date -Format 'HH:mm:ss.fff') - Starting the VM" Start-VM -VM $vm -Confirm:$false -RunAsync | Out-Null Write-Verbose "$(Get-Date -Format 'HH:mm:ss.fff') - Waiting for cloud-init to finish" $User = $Credential.GetNetworkCredential().UserName $Password = $Credential.GetNetworkCredential().Password $sJob = @{ Name = 'WaitForCloudInit' ScriptBlock = $waitJob ArgumentList = $vm.Name, $User, $Password, $global:DefaultVIServer.Name, $global:DefaultVIServer.SessionId } Start-Job @sJob | Receive-Job -Wait Write-Verbose "$(Get-Date -Format 'HH:mm:ss.fff') - Deployment complete" Write-Verbose "`nDeployment took $([math]::Round((New-TimeSpan -Start $start -End (Get-Date)).TotalSeconds,0)) seconds" } |
Annotations
Line 52: To find out when cloud-init has finished it’s run, the function uses a background job. This background job is stored in a separate .ps1 file. More on the content and purpose of that ‘wait’ script later.
Line 53: The user-data is read from the YAML file. It is important to use the Raw switch, otherwise, we would lose the line separators.
Line 60-68: If a VM with the same Displayname is already present, it will be stopped (when powered on) and removed.
Line 70-71: The user-data is assigned to the Common.user_data property of the OVF properties. The user-data needs to be converted to base64.
Line 72: The Ubuntu OVA allows to pass the Portgroup to which the VM shall be connected.
Line 74-83: The VM is installed from the OVA with the Import-VApp cmdlet.
Line 86: The VM is powered on. During the boot process, the first phase of cloud-init will run.
Line 90-98: The function uses a background job to check if the cloud-init process has completed. More on that later.
The Wait job
I decided to store the WaitJob script in a separate .ps1 file. Primarily because I can easily reuse it this way and it makes the code of scripts that use shorter.
The Wait Job is started as a background job. This allows the calling code to simply use the Wait-Job cmdlet.
|
1 2 3 4 5 6 7 8 9 10 11 12 13 14 15 16 17 18 19 20 21 22 23 24 25 26 27 28 29 30 31 32 33 34 35 36 37 38 39 40 41 42 43 44 45 46 47 48 49 50 51 52 53 54 55 56 57 58 59 60 61 |
[CmdletBinding()] param( [string]$vmName, [string]$user, [string]$pswd, [string]$vcsaName, [string]$SessionId ) $sleepTime = 5 Connect-VIServer -Server $vcsaName -Session $SessionId | Out-Null $notFinished = $true while ($notFinished) { Try { $vm = Get-VM -Name $vmName -ErrorAction Stop while ($vm.PowerState -ne 'PoweredOn' -and -not $vm.ExtensionData.Guest.GuestOperationsReady) { Start-Sleep -Seconds $sleepTime } $fileExist = $false while (-not $fileExist) { $sInvoke = @{ VM = $vm ScriptType = 'bash' ScriptText = '[ -f /var/lib/cloud/instance/boot-finished ] && echo "File exist"' GuestUser = $user GuestPassword = $pswd ErrorAction = 'Stop' } try { $result = Invoke-VMScript @sInvoke $fileExist = [Boolean]$result.ScriptOutput } catch { Write-Verbose "$(Get-Date -Format 'HH:mm:ss.fff') Exception:`tId: $($error[0].Exception.ErrorId) Category: $($error[0].Exception.ErrorCategory)" Write-Verbose "$(Get-Date -Format 'HH:mm:ss.fff')`t`tLine: $($error[0].InvocationInfo.Line)" } } $sInvoke = @{ VM = $vm ScriptType = 'bash' ScriptText = 'cat /var/lib/cloud/instance/boot-finished' GuestUser = $user GuestPassword = $pswd } $result = Invoke-VMScript @sInvoke $result.ScriptOutput $notFinished = $false } catch { Write-Verbose "$(Get-Date -Format 'HH:mm:ss.fff') Exception:`tId: $($error[0].Exception.ErrorId) Category: $($error[0].Exception.ErrorCategory)" Write-Verbose "$(Get-Date -Format 'HH:mm:ss.fff')`t`tLine: $($error[0].InvocationInfo.Line)" } Start-Sleep -Seconds $sleepTime } |
Annotations
Line 7 + 11: In a background job we do not inherit any open connections to a vSphere Server. A script can use the SessionId of an open connection in the calling script, to open a connection, without having to provide credentials.
Line 18: Before using the call to Invoke-VMScript, the Wait Job makes sure the VM and the VMware Tools in there, are ready to receive such a call.
Line 28: Inside the guest OS, the function uses the simple bash expression to test for the presence of a file. The file /var/lib/cloud/instance/boot-finished is created by cloud-init when the process completes.
Line 44-52: The Wait Job function returns the content of the file to the caller.
Sample Run
With the above code, we have everything in place to deploy a VM from an Ubuntu OVA, with the guest OS configuration is done through cloud-init, based on a YAML file.
A typical call could look something like this.
|
1 2 3 4 5 6 7 8 9 10 11 12 13 14 15 16 17 18 19 |
$vmName = 'UbuntuBionic' # Get credential for logging on to the guest OS $viCred = Get-VICredentialStoreItem -Host $vmName $secPassword = ConvertTo-SecureString -String $viCred.Password -AsPlainText -Force $cred = [Management.Automation.PSCredential]::new($viCred.User, $secPassword) $sCloudInitVM = @{ OvaFile = '.\bionic-server-cloudimg-amd64.ova' VmName = $vmName ClusterName = 'cluster' DsName = 'vsanDatastore' PgName = 'vdPg1' CloudConfig = '.\user-data-bionic.yaml' Credential = $cred Verbose = $true } Install-CloudInitVM @sCloudInitVM |
With the Verbose switch set to $true, the output of this call would look like this.
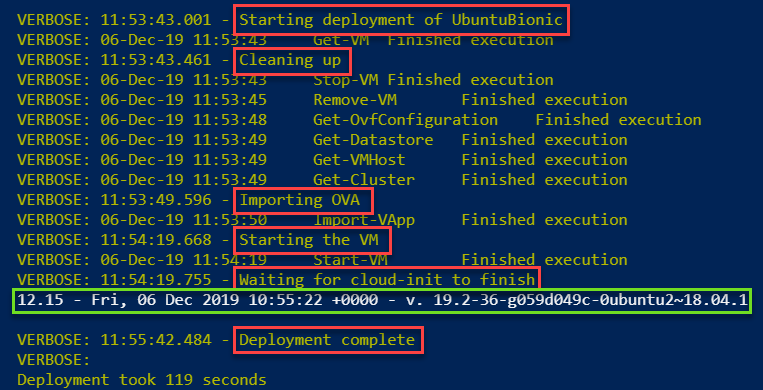
I highlighted with red boxes the verbose messages from the function. The text in the green box is the content of the /var/lib/cloud/instance/boot-finished file.
Do not look too much at the timings. This run happened in my lab environment, which has limited resources. The main reason for showing this is to demonstrate how easy such a cloud-init based deployment can be incorporated in your pipelines.
This concludes Part 1 in the cloud-init series. It provides some functions and scripts to deploy a VM, starting from an OVA file, with the configuration of the guest OS done through cloud-init.
In the upcoming parts in this series, I will show some more advanced Ubuntu deployments, show how cloud-init can be used with Photon and show how you can use these deployed VMs as your ‘cattle‘.
Enjoy!
Patrik Jonsson
Thank you for taking time to write the article. Well explained and gold star for using PowerShell. <3
LucD
Thank you, much appreciated