An interesting question came up in the PowerCLI Community recently. Jason wanted to use a script from another thread where you could connect a NIC to a specific portgroup while cloning a new guest from a template.
The script didn’t work when the requested portgroup was on a dvSwitch. Enough of a reason for me to have another look.
The original script looks up the portgroup on the ESX server and then just copies the VirtualDevice object to the VirtualMachineConfigSpec object.
But, as expected this didn’t seem to work when dealing with dvSwitch portgroups.
In fact, to my amazement, the script created a new portgroup with the same name as the requested dvSwitch portgroup. No error message whatsoever !
The following script solves the problem. It finds the dvSwitch, the portgroup and sets up the configuration parameters correctly for the CloneVM_Task method.
The template was created with a connection to a regular portgroup.
|
1 2 3 4 5 6 7 8 9 10 11 12 13 14 15 16 17 18 19 20 21 22 23 24 25 26 27 28 29 30 31 32 33 34 35 36 37 38 39 40 41 42 43 44 45 46 47 48 49 50 51 52 53 54 55 56 57 58 59 60 |
$templateName = <templateName> $newVM = <vmName> $esxName = <tgt-esxName> $poolName = <tgt-poolName> $folderName = <tgt-folderName> $datastoreName = <tgt-datastoreName> $nicName = "Network adapter 1" $dvPG = "dvPG1" $fromVM = Get-View -Id (Get-Template $templateName).Id $folder = Get-Folder $folderName | Get-View # Find the dvSwitch & dvPortGroup $esx = Get-View -Id $fromVM.Runtime.Host foreach($netMoRef in $esx.Network){ if($netMoRef.Type -eq "DistributedVirtualPortGroup"){ $net = Get-View -Id $netMoRef if($net.Name -eq $dvPg){ $dvPGKey = $net.MoRef.Value $dvSwitchUuid = (Get-View -Id $net.Config.DistributedVirtualSwitch).Summary.Uuid } } } # Find the NIC foreach($tempdev in $fromVM.Config.Hardware.Device){ if($tempdev.DeviceInfo.Label -eq $nicName){ $tgtdev = $tempdev } } $spec = New-Object VMware.Vim.VirtualMachineCloneSpec $spec.Config = New-Object VMware.Vim.VirtualMachineConfigSpec $devSpec = New-Object VMware.Vim.VirtualDeviceConfigSpec $dev = New-Object ("VMware.Vim." + $tgtdev.GetType().Name) $dev.deviceInfo = New-Object VMware.Vim.Description $dev.deviceInfo.label = $tgtdev.DeviceInfo.Label $dev.deviceInfo.summary = $tgtdev.DeviceInfo.Summary $dev.Backing = New-Object VMware.Vim.VirtualEthernetCardDistributedVirtualPortBackingInfo $dev.Backing.Port = New-Object VMware.Vim.DistributedVirtualSwitchPortConnection $dev.Backing.Port.PortgroupKey = $dvPGKey $dev.Backing.Port.SwitchUuid = $dvSwitchUuid $dev.Key = $tgtdev.Key $devSpec.Device = $dev $devSpec.Operation = "edit" $spec.Config.deviceChange += $devSpec $spec.location = New-Object VMware.Vim.VirtualMachineRelocateSpec $spec.location.datastore = (Get-Datastore $datastoreName | Get-View).MoRef $spec.location.host = (Get-VMHost $esxName | Get-View).MoRef $spec.Location.Pool = (Get-ResourcePool $poolName | Get-View).MoRef $spec.powerOn = $false $spec.template = $false $fromVM.CloneVM_Task($folder.MoRef, $newVM, $spec) |
Annotations
Line 15: The script uses the template’s ESX host to find the dvSwitch
Line 20,21: To specify the dvSwitch we need the Uuid and the key of the dvSwitch
Line 27-31: This loop finds the NIC which we want to connect to the dvSwitch portgroup. The script doesn’t have any error handling code for this. If the NIC name is misspelled, the CloneVM_Task will fail.
Line 42,43: The backing device is where the big difference with the original script is located.
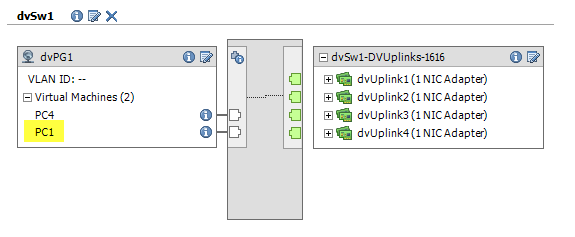
After the script runs you will see your new guest, called PC1 in my test environment, connected to the dvSwitch portgroup.
So with this script you don’t have go updating your huge collection of templates when you move to dvSwitches 😉


Raziel
I’m not good at scripting and I been looking at sample of cloning VM template using customization scripts, came across this crucial part I need since we have various port groups. Where do I add this piece of the script to? Here is what I have.
‘Beginning VM cloning script’
function LoadSnapin{
param($PSSnapinName)
if (!(Get-PSSnapin | where {$_.Name -eq $PSSnapinName})){
Add-pssnapin -name $PSSnapinName
}
}
LoadSnapin -PSSnapinName “VMware.VimAutomation.Core”
Connect-VIServer WDCVCS02
‘Reading CSV file’
$vms = Import-Csv C:\vmtest.csv
$i=0
‘Reading the contents of the CSV, and for each line execute the following code’
foreach ($vm in $vms){
‘Declaring variables that correspond to the column names in the CSV’
$VMName = $vm.name
$VMHost = $vm.host
$Datastore = $vm.datastore
$Template = Get-Template $vm.templatevm
$Customization = $vm.customization
$IPAddress = $vm.ipaddress
$Subnetmask = $vm.subnetmask
$DefaultGW = $vm.gateway
$DNS1 = $vm.dns1
$DNS2 = $vm.dns2
$WINS1 = $vm.wins1
$WINS2 = $vm.wins2
$Location = Get-Folder $vm.location
$NetworkName = $vm.vlan
$Notes = $vm.notes
‘Modifying the customization file with the network information you specified in the CSV’
if (!(Get-VM $VMName -ErrorAction 0))
{
Get-OSCustomizationSpec $Customization | Get-OSCustomizationNicMapping | Set-OSCustomizationNicMapping -IpMode UseStaticIp -IpAddress $IPAddress -SubnetMask $Subnetmask -DefaultGateway $DefaultGW -Dns $DNS1,$DNS2 -Wins $WINS1,$WINS2
‘Deploying new VMs from the template you specified in the CSV’
New-VM -Name $VMName -OSCustomizationSpec $Customization -Template $Template -Location $location -VMHost $VMHost -DiskStorageFormat Thin -Datastore $Datastore -RunAsync
Get-Task | ? {$_.id -eq $Item.id}
}
else
{
“
nVM aleady exists, checking for running tasks . .n”$Task = @(Get-Task | ? {$_.Description -eq “Clone virtual machine”})
if ($Task)
{
#$Task
Write-Host “Task is $($Task[$i].PercentComplete) % complete.”
$i++
}
else
{
“Task is complete!`n”
}
}
‘Powering up the newly created VMs to allow the guest customization to complete’
Start-VM -VM $VMName -Confirm:$false -RunAsync | Wait-Task
Get-VM -Name $VMName | Get-NetworkAdapter | Set-NetworkAdapter -NetworkName $NetworkName -StartConnected $true -Confirm:$false
#Get-Cluster “DEV – HP Rack 2 – Cluster 2 – Windows” | Get-VM $VMName | Update-Tools -NoReboot#
}
‘Ending script’
‘******************************************************************************************************************************************************************’