
In this last part of this series (for now) we will show how to use containers to run your PowerShell/PowerCLI scripts on the deployed instances. And although technically not a ‘real‘ cloud-init post, I consider it related to Part 1, Part 2 and Part3 in this series.

Introduction
In Post 4 of the cloud-init series, we ran our PowerShell/PowerCLI scripts natively in the Guest OS of the instance.
That might have an impact in some situations. When the first script installs for example the VMware PowerCLI modules, these modules will stay installed in the Guest OS. Consider this as a kind of PowerShell tattooing.
Another task that might be somewhat of a challenge is testing your PowerShell scripts against multiple environments, different module versions, different OS versions… Again, when we make changes to the Guest OS, these changes might be hard to remove.
Besides deploying a new ‘cattle’ station for each possible combination, we can also run our scripts in Docker containers. Once the script is done, we throw away the container instance. And we are back to a pristine OS.
And as it turns out, containers also offer some new features that are harder, or even impossible, to implement when running locally in the Guest OS.
Since we will be using several docker commands in the following sections, it will be useful to have the Docker Reference documentation nearby.
Install Docker
Ubuntu
The Ubuntu OVAs we have been installing in the previous posts in this series, do not contain the docker package. We can easily include that in our YAML file under the runcmd section.
|
1 2 3 4 5 6 7 8 9 10 11 12 13 14 15 16 17 18 19 20 21 22 23 24 25 26 27 28 29 30 31 32 33 34 35 36 37 38 39 40 41 42 43 44 45 46 47 48 49 50 51 52 53 54 55 56 57 58 59 60 |
#cloud-config hostname: ubuntubioniccontainer fqdn: ubuntubioniccontainer.local.lab write_files: - path: /etc/netplan/50-cloud-init.yaml content: | network: version: 2 ethernets: ens192: addresses: [192.168.10.84/24] gateway4: 192.168.10.1 dhcp6: false nameservers: addresses: - 192.168.10.2 - 192.168.10.3 search: - local.lab dhcp4: false optional: true - path: /etc/sysctl.d/60-disable-ipv6.conf owner: root content: | net.ipv6.conf.all.disable_ipv6=1 net.ipv6.conf.default.disable_ipv6=1 runcmd: - netplan --debug apply - sysctl -w net.ipv6.conf.all.disable_ipv6=1 - sysctl -w net.ipv6.conf.default.disable_ipv6=1 - apt -y autoremove - apt-get update - apt-get remove docker docker-engine docker.io - apt install docker.io -y - systemctl enable docker - systemctl start docker timezone: Europe/Brussels system_info: default_user: name: default-user lock_passwd: false sudo: ["ALL=(ALL) NOPASSWD:ALL"] disable_root: false ssh_pwauth: yes users: - default - name: luc gecos: LucD lock_passwd: false groups: sudo, users, admin shell: /bin/bash sudo: ['ALL=(ALL) NOPASSWD:ALL'] chpasswd: list: | default-user:$6$2csGx3AAX0RPRMPB$85sEEZ76z0V93M9pvXGtTFrwlMOaV2VjRHB6IKPRrwc.4qEqcs2EnDzn8oUlcVVb9Biq.Pg7qQchLgNLuetkT0 luc:$6$.4Kyvju2v5iR$bvZHOntkH9EqgGdMc7fKZKbB132LYHVIFgxN7Ho.mlMGloUayOaKijR6MvLp/ncf4SynTigjaOKGk11EF9gru/ root:$6$m1TXY60tUAViCYb1$/w.CqV50.M0Nlt6mx2726.bxWZ7/TCqWjOOw4S3h1H8AN.SPWQnKoASXth2E3euBXwebU4Q7dpoGU1SiQontT1 expire: false package_upgrade: true package_reboot_if_required: true |
Annotations
Line 33-36: Install the docker package, start it and make sure it runs after a reboot.
Line 33: If there should already be a docker package installed, this line removes that package. If no docker package is installed, the line does nothing.
Photon
The Photon OVA we use comes with docker installed. No need for any additional commands in the YAML file.
Image microsoft/powershell
In the following sections we will run a number of scripts in the microsoft/powershell container on Ubuntu and Photon. Only when there is a difference between both platforms, will the text mention the platforms.
A Simple Run
Let’s try running a simple PowerShell script in a container on the station.
|
1 2 3 4 5 6 7 8 9 10 11 12 13 14 15 16 17 |
$vmName = 'ubuntubioniccontainer' $code = @' sudo docker run --rm microsoft/powershell:latest pwsh -C 'whoami;Get-Process;pwd' '@ $credItem = Get-VICredentialStoreItem -Host $vmName $cred = New-Object System.Management.Automation.PSCredential ($credItem.User, (ConvertTo-SecureString $credItem.Password -AsPlainText -Force)) $sInvoke = @{ VM = $vmName GuestCredential = $cred ScriptType = 'bash' ScriptText = $code NoIPinCert = $true Verbose = $true } Invoke-VMScriptPlus @sInvoke |
Annotations
Line 3: The docker command we sent to the station. The details of the different parts in this line are explained in the following table.
| run --rm | Run a command in a container and clean up when the container exits |
| microsoft/powershell:latest | The name of the Image. In this case, the latest Microsoft provided stable PowerShell image |
| pwsh -C | The command and argument we send to the container. In this case we start PowerShell and use the Command parameter |
| whoami;Get-Process;pwd | A series of commands, separated by semi-columns, that will be executed by ‘pwsh’ |
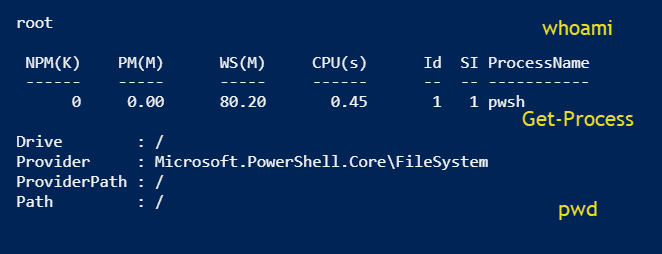
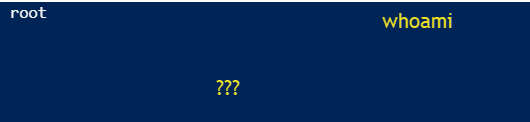
The output will be something like this.
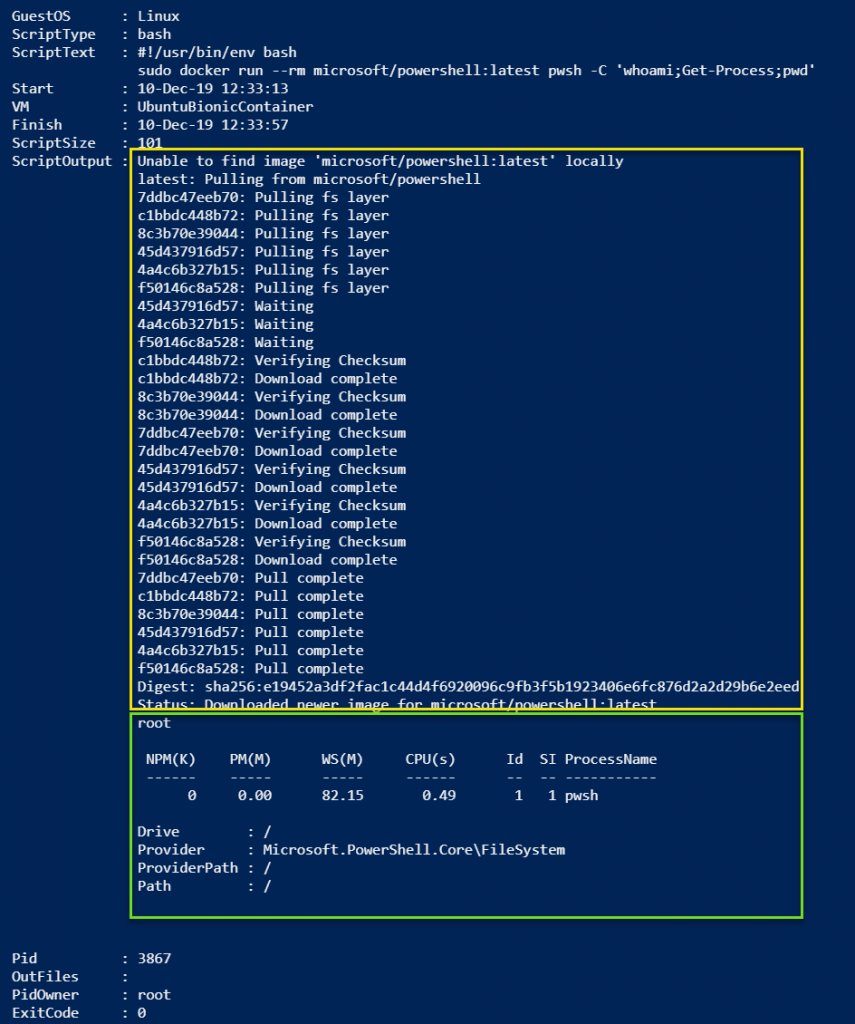
Notice how docker will search for and install the image (since it isn’t present). That is the output in the yellow box. The actual output of the commands we sent to pwsh, are in the green box.
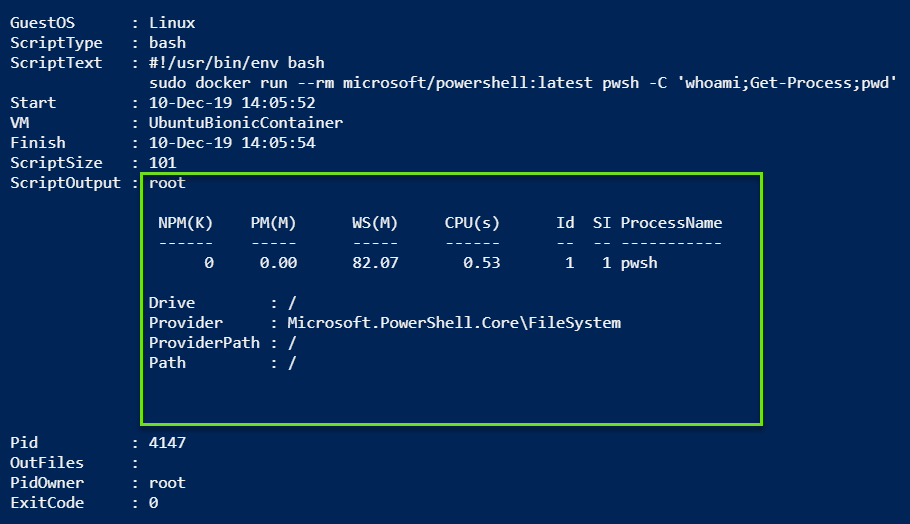
The second time we run the same script, we will only see the actual output of the commands. And that’s because the image is already present.
Modules
Time to start diving into PowerCLI. For that we need to install the VMware PowerCLI modules of course.
|
1 2 3 4 5 6 7 8 9 10 11 12 13 14 15 16 17 18 19 20 21 22 23 24 |
$vmName = 'ubuntubioniccontainer' $script = @' $ProgressPreference = "SilentlyContinue" Install-Module -Name VMware.PowerCLI -AllowClobber -Force | Out-Null Get-Module -Name VMware* -ListAvailable '@ $docker = @' sudo docker run --rm microsoft/powershell:latest pwsh -C '$($script.Replace("`r",'').Split("`n") -join ';')' '@ $credItem = Get-VICredentialStoreItem -Host $vmName $cred = New-Object System.Management.Automation.PSCredential ($credItem.User, (ConvertTo-SecureString $credItem.Password -AsPlainText -Force)) $sInvoke = @{ VM = $vmName GuestCredential = $cred ScriptType = 'bash' ScriptText = $ExecutionContext.InvokeCommand.ExpandString($docker) NoIPinCert = $true Verbose = $true } Invoke-VMScriptPlus @sInvoke |
Annotations
Line 3-7: We use a here-string for the script we want to execute under pwsh in the container.
Line 9-11: And another here-string for the docker command.
Line 10: The script is running on a Windows box, hence the <CR><LF> to <LF>. The second manipulation is to convert the array of lines to a single line, where the lines are separated with a semi-column. Note that the actual conversion does not happen here.
Line 20: The script uses the ExpandString method to perform the text manipulations we described in the comments on Line 10. Also note that we don’t have to escape the dollar-signs in the $script part, since the variable substitution will not go that deep.
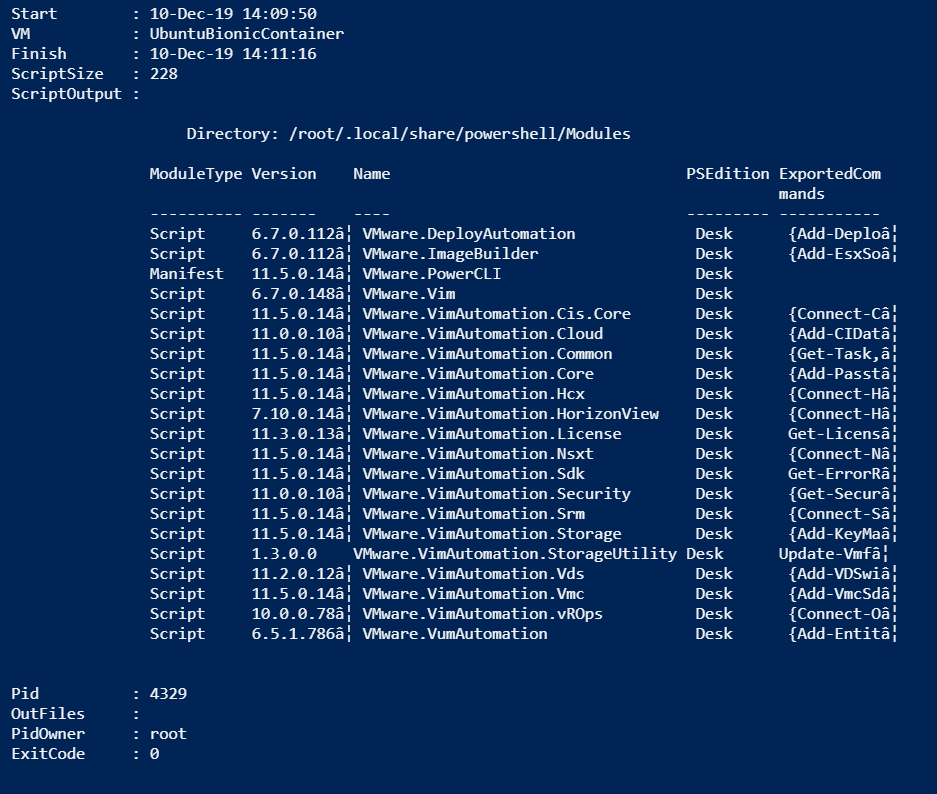
The result (don’t mind the funny characters for now).
ScreenSpace
When we use all the defaults in the container, we seem to end up with a simple screen that has the default 80 x 25 dimensions. For better results, we can introduce bigger screens inside the container.
|
1 2 3 4 5 6 7 8 9 10 11 12 13 14 15 16 17 18 19 20 21 22 23 24 25 26 27 |
$vmName = 'ubuntubioniccontainer' $script = @' reset -w $ProgressPreference = "SilentlyContinue" Install-Module -Name VMware.PowerCLI -AllowClobber -Force | Out-Null Get-Module -Name VMware* -ListAvailable '@ $docker = @' sudo docker run --rm --tty \ -e TERM=xterm -e LINES=25 -e COLUMNS=135 \ microsoft/powershell:latest \ pwsh -C '$($script.Replace("`r",'').Split("`n") -join ';')' '@ $credVM = Get-VICredentialStoreItem -Host $vmName $cred = New-Object System.Management.Automation.PSCredential ($credVM.User, (ConvertTo-SecureString $credVM.Password -AsPlainText -Force)) $sInvoke = @{ VM = $vmName GuestCredential = $cred ScriptType = 'bash' ScriptText = $ExecutionContext.InvokeCommand.ExpandString($docker) NoIPinCert = $true Verbose = $true } Invoke-VMScriptPlus @sInvoke |
Annotations
Line 4: The reset -w command is a fix for an issue that Docker seems to have when a pseudo-terminal (the –tty parameter) is used. With the reset -w command, the terminal will reread the content of setupterm and adjust the lines and columns accordingly.
Line 10: The –tty parameter allocates a pseudo-terminal to the container.
Line 11: The -e parameter is used to set a number of environment variables for the container. In this case, specify that the container shall use an xterm with dimensions 25 x 135.
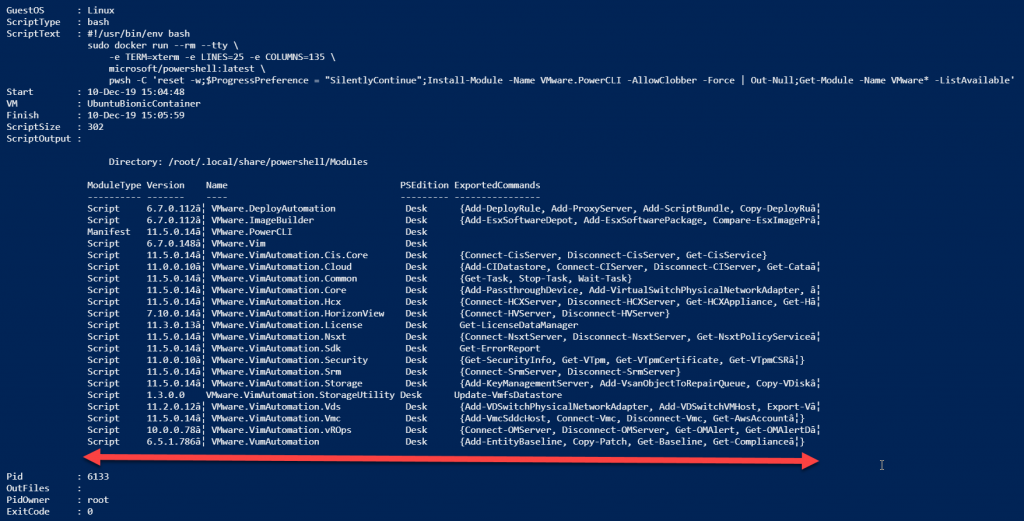
The changed screen is visible in the output (compare it with the width of the previous output).
Volumes
With the method we just showed, we will have to incur the overhead of installing the VMware PowerCLI modules on each run, because we throw away the container after we used it.
But there is a solution for this, by using docker volumes. They are kept inside the guest OS of the instance and can be attached to each container we run.
|
1 2 3 4 5 6 7 8 9 10 11 12 13 14 15 16 17 18 19 20 21 22 23 24 25 26 27 28 29 30 31 32 33 34 35 36 37 38 39 40 41 42 43 44 45 46 47 48 49 50 51 52 53 54 55 56 57 58 |
$vmName = 'ubuntubioniccontainer' $script = @' reset -w \`$ProgressPreference = "SilentlyContinue" if(-not (Get-Module -Name VMware.PowerCLI -ListAvailable)){ Install-Module -Name VMware.PowerCLI -AllowClobber -Force | Out-Null } \`$WarningPreference = 'SilentlyContinue' \`$sConf = @{ InvalidCertificateAction = 'Ignore' ParticipateInCeip = \`$false DisplayDeprecationWarnings = \`$false Scope = 'User' Confirm = \`$false } Set-PowerCLIConfiguration @sConf | Out-Null Connect-VIServer -Server $vcsaName -User $vcsaUser -Password $vcsaPswd | Out-Null Get-VMHost Disconnect-VIServer -Server $vcsaName -Confirm:\`$false '@ $docker = @' sudo docker volume create PCLIModules > /dev/null cat > ~/script.ps1 << EOF $($script.Split("`r")) EOF sudo docker run --rm \ --tty \ -v /PCLIModules:/root/.local/share/powershell/Modules \ -v ~:/Scripts \ -e TERM=xterm -e LINES=25 -e COLUMNS=135 \ microsoft/powershell:latest \ pwsh -F /Scripts/script.ps1 rm ~/script.ps1 '@ $vcsaName = 'vcsa.local.lab' $credVCSA = Get-VICredentialStoreItem -Host $vcsaName $vcsaUser = $credVCSA.User $vcsaPswd = $credVCSA.Password $credVM = Get-VICredentialStoreItem -Host $vmName $cred = New-Object System.Management.Automation.PSCredential ($credVM.User, (ConvertTo-SecureString $credVM.Password -AsPlainText -Force)) #$credItem = Get-VICredentialStoreItem -Host $vmName #$cred = New-Object System.Management.Automation.PSCredential ($credItem.User, (ConvertTo-SecureString $credItem.Password -AsPlainText -Force)) $cred = New-Object System.Management.Automation.PSCredential ($vmUser, (ConvertTo-SecureString $vmPswd -AsPlainText -Force)) $dockerExpanded = $ExecutionContext.InvokeCommand.ExpandString($docker) $sInvoke = @{ VM = $vmName GuestCredential = $cred ScriptType = 'bash' ScriptText = $ExecutionContext.InvokeCommand.ExpandString($dockerExpanded) NoIPinCert = $true } Invoke-VMScriptPlus @sInvoke |
Annotations
Line 5: We have some ‘Inception’ going on here, hence the ‘`’ sequence before the dollar sign. In line 50 we substitute the variables in the bash script itself. That way we can provide the script as an inline file in the bash script. But since bash also interprets that back-tick, we have to escape it. The back-tick itself is to avoid variable substitution that is done in line 55.
Line 24: We create a docker volume named PCLIModules. If that volume already exists, the bash script will just continue.
Line 25-27: Instead of having the PowerShell/PowerCLI script in the Command parameter of the pwsh command, we use an inline file. This effectively creates a .ps1 file in the home directory of the user in the guest OS.
Line 30: The Volume parameter on the docker run command maps the docker volume PCLIModules to the folder /root/.local/share/powershell/Modules in the container. With an Install-Module, the modules will be installed in this /root/.local/share/powershell/Modules , and thus be stored on the docker volume PCLIModules. This volume can be reused on subsequent runs of the container, eliminating the need to install the VMware PowerCLI modules on each run.
Line 31: On the docker run command we map the user’s home directory (~) in the guest OS to a folder, named Scripts in the container.
Line 34: The pwsh command that runs in the container uses the File parameter to run the .ps1 file created in lines 25-27.
Line 35: The .ps1 file that was created before calling the docker run command, is now removed.
Line 55: The second substitution round. In this case we substitute primarily all non-escaped (back-tick) dollar sign in the PowerShell script (at this point in the script present as an inline file in the bash script).
The result when we run the script.
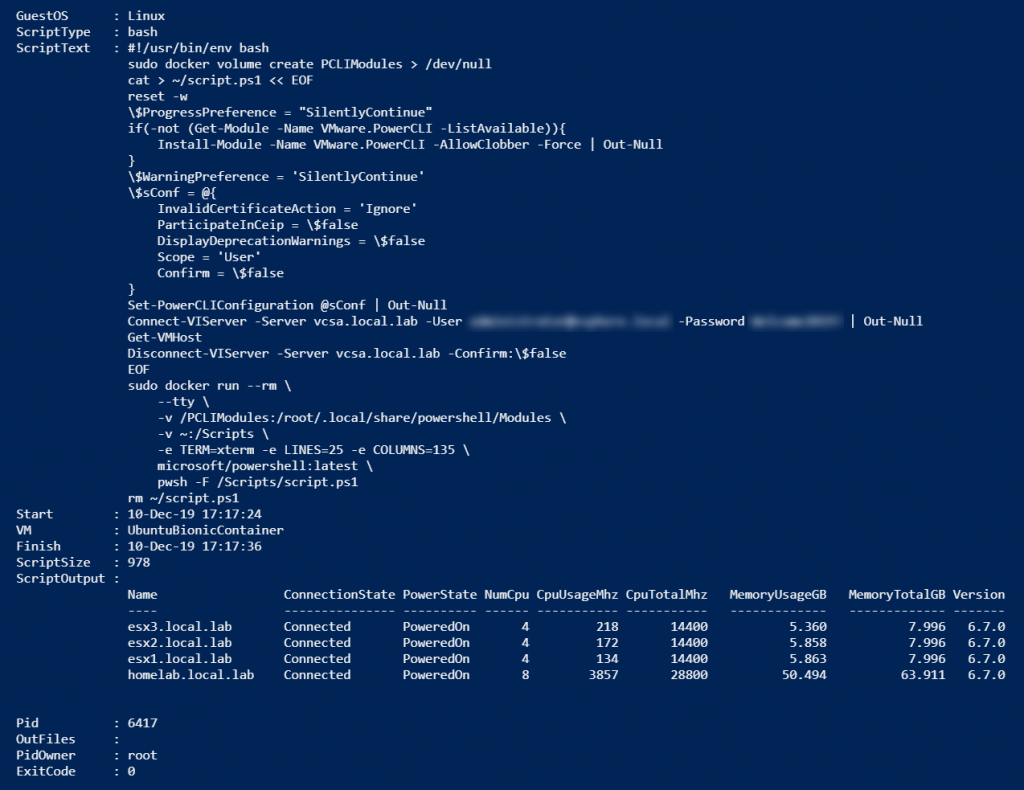
Notice how the ScriptText property contains the bash script as it is presented to the Guest OS of the instance. In there the dollar signs are escaped (with a back-slash) to avoid substitution by bash.
ANSI codes and Existing Scripts
In this section, we will tackle two subjects.
- Eliminate those ‘funny’ characters in the output
- How to run my existing script, similar to what we did in Part 4 – Running Scripts.
As it turns out, these ‘funny characters’ are ANSI escape codes. In the container, we are using a pseudo-terminal, and as a result, the OS in the container sends those ANSI escape codes to position the cursor, change the text colour, but also those ‘…’ (three dots) when PowerShell has to cut short the value of a property.
For now, the only way if found to eliminate those ANSI escape codes, is to find and replace them.
For using your existing scripts in this setup, we adopt the same strategy as we did in Part 4 – Running Scripts.
Our existing script, in Sample-PCLI-Script3.ps1, looks like this.
|
1 2 3 |
Get-VMHost | Select Name, NumCpu, Version | ConvertTo-Html |
And the script to run all this looks like this
|
1 2 3 4 5 6 7 8 9 10 11 12 13 14 15 16 17 18 19 20 21 22 23 24 25 26 27 28 29 30 31 32 33 34 35 36 37 38 39 40 41 42 43 44 45 46 47 48 49 50 51 52 53 54 55 56 57 58 59 60 61 62 63 64 65 66 67 |
$vmName = 'ubuntubioniccontainer' $prefix = @' reset -w `$ProgressPreference = "SilentlyContinue" if(-not (Get-Module -Name VMware.PowerCLI -ListAvailable)){ Install-Module -Name VMware.PowerCLI -AllowClobber -Force | Out-Null } `$WarningPreference = 'SilentlyContinue' `$sConf = @{ InvalidCertificateAction = 'Ignore' ParticipateInCeip = `$false DisplayDeprecationWarnings = `$false Scope = 'User' Confirm = `$false } Set-PowerCLIConfiguration @sConf | Out-Null Connect-VIServer -Server $vcsaName -User $vcsaUser -Password $vcsaPswd | Out-Null '@ $script = Get-Content -Path .\Sample-PCLI-Script3.ps1 $suffix = @' Disconnect-VIServer -Server $vcsaName -Confirm:`$false '@ $docker = @' sudo docker volume create PCLIModules > /dev/null cat > ~/script.ps1 << 'EOF' $($prefix.Split("`r")) $($script -join "`n") $($suffix.Split("`r")) EOF sudo docker run --rm \ --tty \ -v /PCLIModules:/root/.local/share/powershell/Modules \ -v ~:/Scripts \ -e TERM=xterm -e LINES=25 -e COLUMNS=135 \ microsoft/powershell:latest \ pwsh -F /Scripts/script.ps1 > ~/result.txt cat ~/result.txt rm ~/result.txt rm ~/script.ps1 '@ $vcsaName = 'vcsa.local.lab' $credVCSA = Get-VICredentialStoreItem -Host $vcsaName $vcsaUser = $credVCSA.User $vcsaPswd = $credVCSA.Password $credVM = Get-VICredentialStoreItem -Host $vmName $cred = New-Object System.Management.Automation.PSCredential ($credVM.User, (ConvertTo-SecureString $credVM.Password -AsPlainText -Force)) $dockerExpanded = $ExecutionContext.InvokeCommand.ExpandString($docker) $sInvoke = @{ VM = $vmName GuestCredential = $cred ScriptType = 'bash' ScriptText = $ExecutionContext.InvokeCommand.ExpandString($dockerExpanded) NoIPinCert = $true Verbose = $true } $result = Invoke-VMScriptPlus @sInvoke # Remove ANSI Escape Sequences ($result.ScriptOutput.Split("`n") | Foreach-Object -Process { ($_ -replace "\xe2\x80\xa6","…") -replace "\x1b\[\?[1-9]h|\x1b\[[1-9]n|\x1b=|\x1b\]0;|\x07|\x1b\]0;", '' }) -join "`n" |
Annotations
Line 3, 20, 21: We split the code into three parts. A fixed prefix, the code of our existing script and a suffix.
Line 27-31: We use the same concept of an inline file as we did in the previous section. The only difference is that we now have three parts instead of one.
Line 64-67: The ANSI escape sequences are removed from the output. The RegEx expression does not cover all possible ANSI escape sequences, but it did the job for all the ones I encountered. On the other hand, the RegEx expression can easily be expanded.
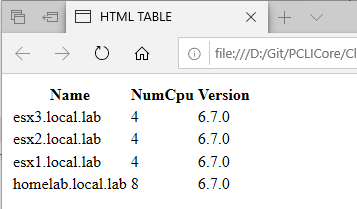
The result, which is an HTML file, looks like this.
The part where we filter away the ANSI code sequence is also used to translate some well-known characters. Remember the funny characters in the module list?
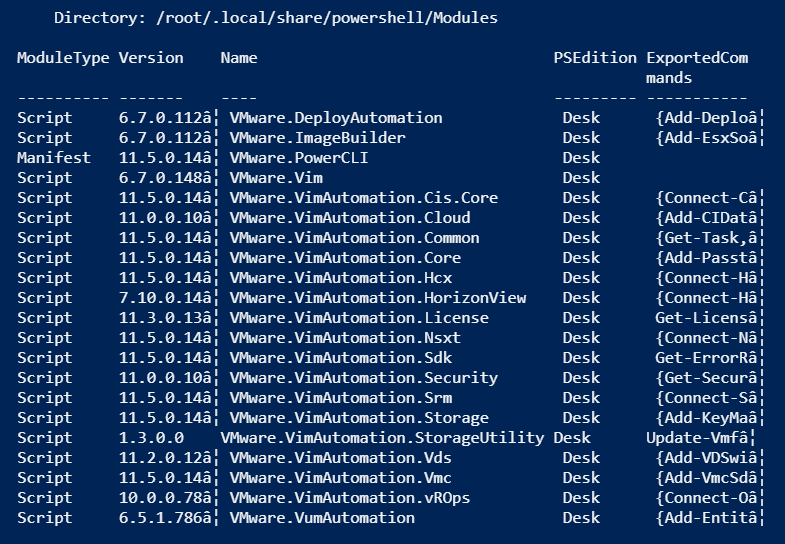
With the first -replace operator in the previous code, we can change this back to the character we are used to. The hex sequence 0xE2, 0x80, 0xA6 that get back is, in fact, the code for the horizontal ellipsis, the 3 horizontal dots PowerShell uses to indicate a cut off value.
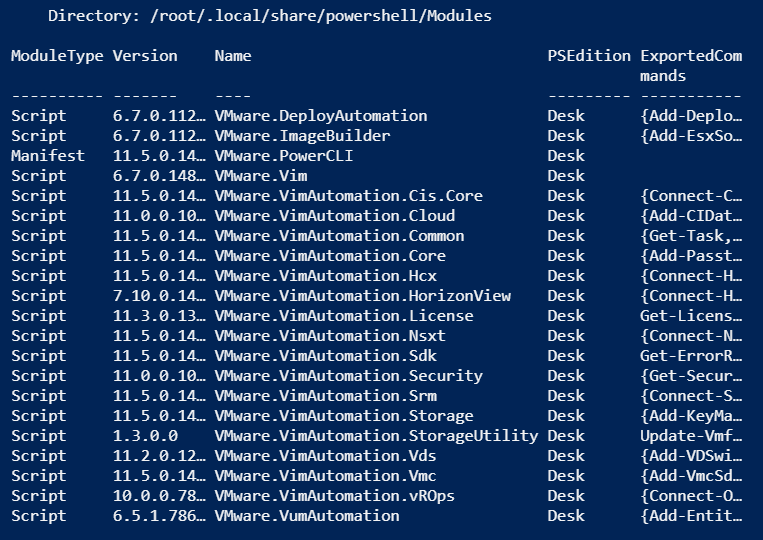
There are most probably many other characters or character combinations that do not translate well, but at least we have a method to correct this.
InFile & OutFile
Using inline files and the stdout stream for input and results works in most cases, but it might make things needlessly complex in others. To avoid that, we can make use of the InFile and OutFile parameters on the Invoke-VMScriptPlus function. The parameters allows us to pass one or more files along with the script, and retrieve one or more files back from the environment where the script runs.
If we use InFile and OutFile together with containers, there is some Inception going on. The following schematic might make this a bit more visible.
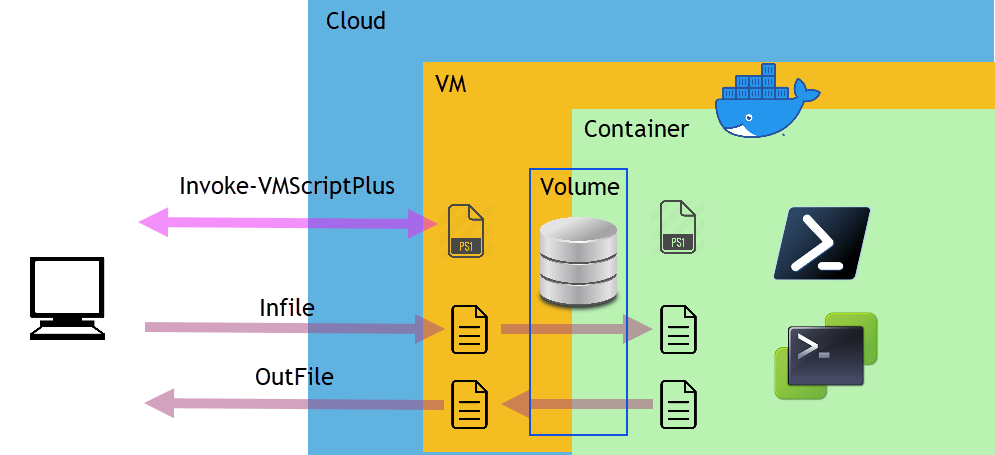
As you can see, the InFile files are stored in the guest OS of the instance. And then through the Volume parameter on the docker command, passed along into the container.
The same goes for the OutFile files but in the reverse sense.
We are going to execute an existing script. Note how to make a small change in the path of the resulting file. We have to use the path to the Scripts folder, which will be mapped through the Volume parameter.
|
1 2 3 4 5 |
Get-VMHost | Select Name, NumCpu, Version | ConvertTo-Html | Out-File -FilePath \Scripts\report.html Write-Host "Script completed" |
And this is the script that will run that script in a container.
|
1 2 3 4 5 6 7 8 9 10 11 12 13 14 15 16 17 18 19 20 21 22 23 24 25 26 27 28 29 30 31 32 33 34 35 36 37 38 39 40 41 42 43 44 45 46 47 48 49 50 51 52 53 54 55 56 57 58 59 60 61 62 63 |
$vmName = 'ubuntubioniccontainer' $oldScript = '.\Sample-PCLI-Script.ps1' $tempScript = 'script.ps1' $script = @' reset -w `$ProgressPreference = "SilentlyContinue" if(-not (Get-Module -Name VMware.PowerCLI -ListAvailable)){ Install-Module -Name VMware.PowerCLI -AllowClobber -Force | Out-Null } `$WarningPreference = 'SilentlyContinue' `$sConf = @{ InvalidCertificateAction = 'Ignore' ParticipateInCeip = `$false DisplayDeprecationWarnings = `$false Scope = 'User' Confirm = `$false } Set-PowerCLIConfiguration @sConf | Out-Null Connect-VIServer -Server $vcsaName -User $vcsaUser -Password $vcsaPswd | Out-Null ####### My Script ###### $(Get-Content -Path $oldScript -Raw) ######################## Disconnect-VIServer -Server $vcsaName -Confirm:`$false '@ $docker = @' sudo docker volume create PCLIModules > /dev/null sudo docker run --rm \ --tty \ -v /PCLIModules:/root/.local/share/powershell/Modules \ -v `$(pwd):/Scripts \ -e TERM=xterm -e LINES=25 -e COLUMNS=135 \ microsoft/powershell:latest \ pwsh -F /Scripts/$($tempScript) '@ $vcsaName = 'vcsa.local.lab' $credVCSA = Get-VICredentialStoreItem -Host $vcsaName $vcsaUser = $credVCSA.User $vcsaPswd = $credVCSA.Password $credVM = Get-VICredentialStoreItem -Host $vmName $cred = New-Object System.Management.Automation.PSCredential ($credVM.User, (ConvertTo-SecureString $credVM.Password -AsPlainText -Force)) $tempScript = 'script.ps1' $ExecutionContext.InvokeCommand.ExpandString($script) | Out-File -LiteralPath $tempScript $sInvoke = @{ VM = $vmName GuestCredential = $cred ScriptType = 'bash' ScriptText = $ExecutionContext.InvokeCommand.ExpandString($docker) NoIPinCert = $true InFile = $tempScript OutFile = 'report.html' } Invoke-VMScriptPlus @sInvoke Remove-Item -LiteralPath $tempScript -Confirm:$false Invoke-Item -Path .\report.html |
Annotations
Line 2: The name of our script we want to execute. Note that we had to change the Path of the resulting file. This to allow the mapping through the volume parameter on the docker run command.
Line 3: A filename for the script we are going to run in the container. Ultimately this could be replaced by a randomly generated filename.
Line 5-27: The full script we are sending to the container. It is comprised of the Prefix, our original script and the Suffix. The Prefix and Suffix are the same as we have shown in previous sections. The only difference is that all three parts now come together in one here-string.
Line 23: We substitute this line with our original script later on with the call to ExpandString.
Line 29-38: The actual bash script, with the docker commands, that we are running inside the Guest OS of the instance.
Line 49: We expand the $script variable and save the resulting text to a file.
Line 54: Another call to ExpandString. This time to substitute the variables in the $docker variable.
Line 56: The script file we send along to the Guest OS.
Line 57: The output file we retrieve from the Guest OS.
The script’s output looks like this. Notice that it only contains the result from the Write-Host line in our original script.

And the result, report.html, is displayed in a web browser through the Invoke-Item cmdlet.
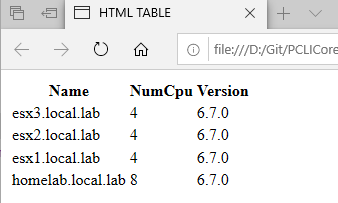
Image vmware/powerclicore
Shortly after the new tdnf package for PowerShell was made available, a new version of the vmware/powerclicore docker image was created.
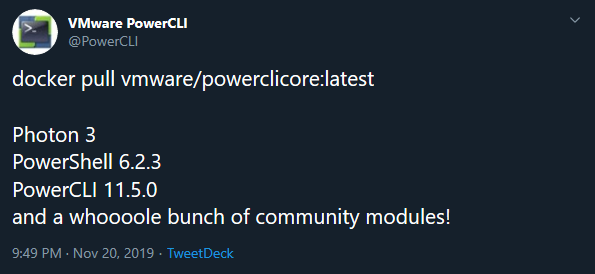
The difference with the microsoft/powershell image is the underlying OS, Photon v3R2 instead of Ubuntu 18.04.
Let’s start with a simple script, similar to the one we used earlier.
|
1 2 3 4 5 6 7 8 9 10 11 12 13 14 15 16 |
$code = @' docker run --rm microsoft/powershell:latest pwsh -C 'whoami;Get-Process;pwd' '@ $credItem = Get-VICredentialStoreItem -Host $vmName $cred = New-Object System.Management.Automation.PSCredential ($credItem.User, (ConvertTo-SecureString $credItem.Password -AsPlainText -Force)) $sInvoke = @{ VM = $vmName GuestCredential = $cred ScriptType = 'bash' ScriptText = $code NoIPinCert = $true GuestOSType = 'linux' } Invoke-VMScriptPlus @sInvoke | select -ExpandProperty ScriptOutput |
With the microsoft/powershell image this produces the following. We see the result of all three commands.
On the vmware/powerclicore image, the result is a bit different. The whoami output is there, but the output from the other two commands is missing.
As it turns out, there is an issue when passing commands to pwsh via the Command parameter. When using the File parameter everything seems to work well.
One difference to note, compared with the micorosft/powershell image, the vmware/powerclicore:latest image, and the Photon OS in that image, have minimal terminal types present. As a result, you will need to set the TERM environment variable to linux instead of xterm.
A typical call would look something like this.
|
1 2 3 4 5 6 7 8 |
docker volume create PCLIModules > /dev/null docker run --rm \ --tty \ -v /PCLIModules:/root/.local/share/powershell/Modules \ -v `$(pwd):/Scripts \ -e TERM=linux -e LINES=25 -e COLUMNS=135 \ vmware/powerclicore:latest \ pwsh -F /Scripts/script.ps1 |
Image mcr.microsoft.com/powershell:preview
Note that there is also an image for the latest PS v7 Preview available. If you want to test/develop your scripts in this PS v7 Preview, this is a simple and easy method to do it.
All previous methods discussed in this post work against this Preview.
Enjoy!
p
Tayfun Deger
Thanks for sharing:)