
In Part 1 and Part 2 of this series we used Ubuntu as the guest OS of our target instances. In Part 3 we will show how to use VMware’s Photon OS as our guest OS.
The main reason to use Photon OS is that it is open-sourced, it has a small footprint and it is optimised for VMware vSphere.
Some Background
Does this mean that Photon OS is the ideal guest OS for our ‘cattle‘ stations where we want to run our PowerShell scripts?
Not really, the major flaw with Photon OS, imho, is that the available packages are limited and rather infrequently maintained.
In fact, until recently the available PowerShell package was an outdated, not supported anymore version. But the worst part of the deal, it didn’t even allow to perform an Install-Module. Which, again imho, is a basic concept in PowerShell. And which didn’t allow me to install, for example, VMware PowerCLI on a Photon station.
But then recently this happened!
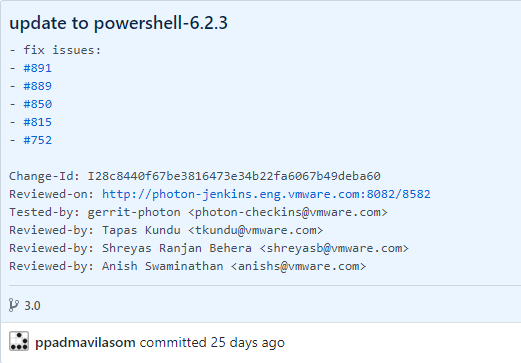
The available PowerShell v6 TDNF package was upgraded to a currently supported version, and more importantly, the Import-Module cmdlet worked!
Allowing us to install VMware PowerCLI on a Photon instance.
Is this the end of all the PowerShell woes on Photon OS?
Not really! The PowerShell version in this TDNF package will also run out of support in a not so far future and a PowerShell TDNF package upgrade is (still) not automated and somewhat of a black art.
But for now, let’s be happy with what we have and ‘cloud-init’ our Photon ‘cattle’ station!
Issues and some Solutions
No UserData Property
While the Ubuntu cloud image, as we saw in Part 1 of the series, has the option to pass the user-data to cloud-init via an OVF property, this feature is unfortunately not available in the Photon OVA.
There are some solutions available.
- Roll your own OVA image
- Use the NoCloud option, which means creating an ISO containing the user-data and attaching this ISO to the instance before cloud-init runs.
Since I prefer to use the ‘standard’ OVA, I opt for creating such a seed ISO.
The Root Password
This is somewhat of a chicken-and-the-egg dilemma.
In the Photon OVA image, the root account is set to force a password change on first use. But unfortunately, this also disallows setting the root password via the user-data. See Issue#931 for more details.
Again, there are two options available.
- Roll your own OVA image
- Use a two-stage process, wherein the first stage we use William Lam‘s Set-VMKeystrokes function. Then in the second stage, we attach the seed ISO and start the instance. And thus kicking off the cloud-init process.
And again, since I prefer to use the ‘standard’ OVA, I opt for the Set-VMKeystrokes solution.
Install-CloudInitVM Revisited
|
1 2 3 4 5 6 7 8 9 10 11 12 13 14 15 16 17 18 19 20 21 22 23 24 25 26 27 28 29 30 31 32 33 34 35 36 37 38 39 40 41 42 43 44 45 46 47 48 49 50 51 52 53 54 55 56 57 58 59 60 61 62 63 64 65 66 67 68 69 70 71 72 73 74 75 76 77 78 79 80 81 82 83 84 85 86 87 88 89 90 91 92 93 94 95 96 97 98 99 100 101 102 103 104 105 106 107 108 109 110 111 112 113 114 115 116 117 118 119 120 121 122 123 124 125 126 127 128 129 130 131 132 133 134 135 136 137 138 139 140 141 142 143 144 145 146 147 148 149 150 151 152 153 154 155 156 157 158 159 160 161 162 163 164 165 166 167 168 169 170 171 172 173 174 175 176 177 178 179 180 181 182 183 184 185 186 187 188 189 190 191 192 193 194 195 196 197 198 199 200 201 202 203 204 205 206 207 208 209 210 211 212 213 214 215 216 217 218 219 220 221 222 223 224 225 226 227 228 229 230 231 232 233 234 235 236 237 238 239 240 241 242 243 244 245 246 247 248 249 |
function Install-CloudInitVM { <# .SYNOPSIS Deploy a VM from an OVA file and use cloud-init for the configuration .DESCRIPTION This function will deploy an OVA file. The function transfer the user-data to the cloud-init process on the VM with one of the OVF properties. .NOTES Author: Luc Dekens Version: 1.0 05/12/19 Initial release 1.1 07/12/19 Added Photon deployment Added seed ISO option .PARAMETER OvaFile Specifies the path to the OVA file .PARAMETER VmName The displayname of the VM .PARAMETER ClusterName The cluster onto which the VM shall be deployed .PARAMETER DsName The datastore on which the VM shall be deployed .PARAMETER PgName The portgroupname to which the VM shall be connected .PARAMETER CloudConfig The path to the YAML file containing the user-data .PARAMETER CloudConfigISO The ISO seed file, containing the meta-data and user-data .PARAMETER Credential The credentials for a user in the VM's guest OS .PARAMETER Photon Switch to indicate a Photon is deployed. This will add an additional step to reset the root password before starting the actual cloud-init based deployment .EXAMPLE $sCloudInitVM = @{ OvaFile = '.\bionic-server-cloudimg-amd64.ova' VmName = $vmName ClusterName = $clusterName DsName = $dsName PgName = $pgName CloudConfig = '.\user-data.yaml' Credential = $cred } Install-CloudInitVM @sCloudInitVM .EXAMPLE $sCloudInitVM = @{ OvaFile = '.\photon-hw13_uefi-3.0-9355405.ova' VmName = $vmName ClusterName = $clusterName DsName = $dsName PgName = $pgName CloudConfigISO = '.\seed.iso' Credential = $cred Photon = $true } Install-CloudInitVM @sCloudInitVM #> [cmdletbinding()] param( [string]$OvaFile, [string]$VmName, [string]$ClusterName, [string]$DsName, [string]$PgName, [Parameter(ParameterSetName = 'YAML')] [string]$CloudConfig, [Parameter(ParameterSetName = 'SeedISO')] [string]$CloudConfigISO, [PSCredential[]]$Credential, [Switch]$Photon ) $waitJob = (Get-Command -Name .\Wait-Job.ps1 ).ScriptBlock if ($PSCmdlet.ParameterSetName -eq 'YAML') { $userData = Get-Content -Path $CloudConfig -Raw } Write-Verbose "$(Get-Date -Format 'HH:mm:ss.fff') - Starting deployment of $vmName" if ($Photon) { Write-Verbose "$(Get-Date -Format 'HH:mm:ss.fff') - This is a Photon deployment" } $start = Get-Date $vm = Get-VM -Name $vmName -ErrorAction SilentlyContinue -Verbose:$false if ($vm) { Write-Verbose "$(Get-Date -Format 'HH:mm:ss.fff') - Cleaning up" if ($vm.PowerState -eq 'PoweredOn') { Stop-VM -VM $vm -Confirm:$false -Verbose:$false | Out-Null } Remove-VM -VM $vm -DeletePermanently -Confirm:$false -Verbose:$false } $ovfProp = Get-OvfConfiguration -Ovf $ovaFile -Verbose:$false if (-not $Photon) { $ovfProp.Common.user_data.Value = [System.Convert]::ToBase64String([System.Text.Encoding]::UTF8.GetBytes($userData)) $ovfProp.NetworkMapping.VM_Network.Value = $pgName } else { $ovfProp.NetworkMapping.None.Value = $pgName } $sApp = @{ Source = $ovaFile Name = $vmName Datastore = Get-Datastore -Name $dsName -Verbose:$false DiskStorageFormat = 'Thin' VMHost = Get-Cluster -Name $clusterName -Verbose:$false | Get-VMHost -Verbose:$false | Get-Random OvfConfiguration = $ovfProp Verbose = $false } Write-Verbose "$(Get-Date -Format 'HH:mm:ss.fff') - Importing OVA" $vm = Import-VApp @sApp Write-Verbose "$(Get-Date -Format 'HH:mm:ss.fff') - Starting the VM" Start-VM -VM $vm -Confirm:$false -RunAsync -Verbose:$false | Out-Null if ($Photon) { while (-not $vm.ExtensionData.Guest.GuestOperationsReady) { Start-Sleep 2 $vm.ExtensionData.UpdateViewData('Guest') } Write-Verbose "$(Get-Date -Format 'HH:mm:ss.fff') - Resetting password" $PswdIsReset = $false while (-not $PswdIsReset) { Set-VMKeystrokes -VMName $VM.Name -StringInput 'root' -ReturnCarriage $true | Out-Null Start-Sleep 1 Set-VMKeystrokes -VMName $VM.Name -StringInput 'changeme' -ReturnCarriage $true | Out-Null Start-Sleep 1 Set-VMKeystrokes -VMName $VM.Name -StringInput 'changeme' -ReturnCarriage $true | Out-Null Start-Sleep 1 Set-VMKeystrokes -VMName $VM.Name -StringInput 'Welcome2019!' -ReturnCarriage $true | Out-Null Start-Sleep 1 Set-VMKeystrokes -VMName $VM.Name -StringInput 'Welcome2019!' -ReturnCarriage $true | Out-Null Start-Sleep 1 Set-VMKeystrokes -VMName $VM.Name -StringInput "exit" -ReturnCarriage $true | Out-Null Write-Verbose "$(Get-Date -Format 'HH:mm:ss.fff') - Testing new password" $sInvoke = @{ VM = $vm ScriptType = 'bash' ScriptText = 'whoami' GuestUser = $Credential.GetNetworkCredential().UserName GuestPassword = $Credential.GetNetworkCredential().Password Verbose = $false } try { Invoke-VMScript @sInvoke -ErrorAction Stop | Out-Null $PswdIsReset = $true } catch [VMware.VimAutomation.ViCore.Types.V1.ErrorHandling.InvalidGuestLogin] { Start-Sleep -Seconds 1 } catch { Write-Error "Exception $($error[0].Exception.GetType().FullName)" return } } Write-Verbose "$(Get-Date -Format 'HH:mm:ss.fff') - Shutdown VM" Shutdown-VMGuest -VM $vm -Confirm:$false -Verbose:$false | Out-Null while ($vm.ExtensionData.Runtime.PowerState -ne 'poweredOff') { Start-Sleep 2 $vm.ExtensionData.UpdateViewData('Runtime.PowerState') } Write-Verbose "$(Get-Date -Format 'HH:mm:ss.fff') - Attaching seed ISO" $isoName = Split-Path -Path $CloudConfigISO -Leaf $isoFile = "DS:\$($vm.ExtensionData.Summary.Config.VmPathName.Split(' ')[1].Split('/')[0])\$($isoName)" Get-PSDrive -Name DS -ErrorAction SilentlyContinue -Verbose:$false | Remove-PSDrive -Confirm:$false -Verbose:$false New-PSDrive -Location (Get-Datastore -VM $vm) -Name DS -PSProvider VimDatastore -Root '\' -Verbose:$false | Out-Null Get-Item -Path $CloudConfigISO | Copy-DatastoreItem -Destination $isoFile -Force -Confirm:$false -Verbose:$false $isoDSPath = $vm.ExtensionData.Summary.Config.VmPathName.Replace("$vmName.vmx", $isoName) Get-CDDrive -VM $vm -Verbose:$false | Set-CDDrive -IsoPath $isoDSPath -StartConnected:$true -Confirm:$false -Verbose:$false | Out-Null Write-Verbose "$(Get-Date -Format 'HH:mm:ss.fff') - Starting the VM" Start-VM -VM $vm -Confirm:$false -Verbose:$false | Out-Null } Write-Verbose "$(Get-Date -Format 'HH:mm:ss.fff') - Waiting for cloud-init to finish" $User = $Credential.GetNetworkCredential().UserName $Password = $Credential.GetNetworkCredential().Password $sJob = @{ Name = 'WaitForCloudInit' ScriptBlock = $waitJob ArgumentList = $vm.Name, $User, $Password, $global:DefaultVIServer.Name, $global:DefaultVIServer.SessionId } Start-Job @sJob | Receive-Job -Wait if ($Photon) { Write-Verbose "$(Get-Date -Format 'HH:mm:ss.fff') - Restart OS" $vmGuest = Stop-VMGuest -VM $vm -Confirm:$false -Verbose:$false while ($vmGuest.VM.ExtensionData.Runtime.PowerState -ne 'poweredOff') { Start-Sleep 2 $vmGuest.VM.ExtensionData.UpdateViewData('Runtime.PowerState') } $vm = Start-VM -VM $vmName -Confirm:$false -Verbose:$false while ($vm.PowerState -ne 'PoweredOn') { Start-Sleep 2 $vm = Get-VM -Name $VmName -Verbose:$false } while (-not $vm.ExtensionData.Guest.GuestOperationsReady) { Write-Verbose "$(Get-Date -Format 'HH:mm:ss.fff') - Waiting for GuestOperations ready" Start-Sleep 2 $vm.ExtensionData.UpdateViewData('Guest') } Write-Verbose "$(Get-Date -Format 'HH:mm:ss.fff') - Eject CDROM" $sInvoke = @{ VM = $vm ScriptType = 'bash' ScriptText = 'eject cdrom' GuestUser = $Credential.GetNetworkCredential().UserName GuestPassword = $Credential.GetNetworkCredential().Password Verbose = $false } Invoke-VMScript @sInvoke | Out-Null Get-CDDrive -VM $vm -Verbose:$false | Set-CDDrive -NoMedia -Confirm:$false -Verbose:$false | Out-Null } Write-Verbose "$(Get-Date -Format 'HH:mm:ss.fff') - Deployment complete" Write-Verbose "`nDeployment took $([math]::Round((New-TimeSpan -Start $start -End (Get-Date)).TotalSeconds,0)) seconds" } |
Annotations
The v1.0 version of this function has already been annotated in Part 1 of this series. Those annotations will not be repeated here.
Line 68-71: To distinguish between the way the user-data is passed, the function now has two mutually exclusive parameters, CloudConfig and CloudConfigIso.
Line 73: Since Photon requires some special actions, the function now has a switch, obviously named Photon, that specifies if the cloud-init deployment is intended for a Photon instance or not.
Line 77-80: When the user-data is provided as a YAML file, the function reads the file.
Line 83-86: A small reminder in the verbose output that the function will handle this as a Photon deployment.
Line 102-110: The Ubuntu and the Photon OVA files have different OVF properties. This If-Then-Else handles the differences.
Line 126-199: This part of the function handles most of the peculiarities of a Photon deployment.
Line 136-175: This part handles the reset of the root password. As mentioned earlier, it uses William’s Set-VMKeystrokes function. I experienced intermittent race conditions in sending the keystrokes. Hence the loop with the retries. As a test, to check if the root password was reset, the command ‘whoami‘ is executed trough Invoke-VMScript on the instance.
Line 179-184: Before attaching the seed ISO, the Photon OS is shutdown gracefully. In a While-loop the script test until the instance is actually powered off.
Line 188-195: The seed ISO is copied to the VM’s folder, and then attached.
Line 198: The VM is started with the seed ISO attached. As a result, cloud-init will now use the YAML files it finds on the CD drive as datasource.
Line 216-221: Since the cloud-init implementation on Photon is not configured to use the power-state module, the test we used on the Ubuntu instance, can not be used for Photon. As a bypass, the function stops/starts the guest OS on the instance.
Line 235-244: The function uses the stop/start sequence to disconnect the seed ISO. To avoid having a question on the VM, the function first runs the ‘eject cdrom‘ command inside the instance.
The Seed ISO
As mentioned earlier, I prefer to use a seed ISO file to solve the issue of not having an OVF property for the user-data.
To create this seed ISO file, we need a Linux station that has the ‘genisoimage‘ command available. In the following sample script, I use an Ubuntu station just for that purpose.
|
1 2 3 4 5 6 7 8 9 10 11 12 13 14 15 16 17 18 19 20 21 22 23 24 25 26 27 28 29 30 31 32 33 34 35 |
$workVM = 'UbuntuPS' $isoName = 'genisoimage-ps.iso' $isoVolId = 'cidata' $isoFiles = @{ 'meta-data' = 'meta-data.yaml' 'user-data' = 'user-data.yaml' } $code1 = @' sudo apt-get install genisoimage -y > null genisoimage -output $isoName -volid $isoVolId -joliet -rock $($isoFiles.Keys -join ' ') '@ $workCred = Get-VICredentialStoreItem -Host $workVM $isoFiles.GetEnumerator() | ForEach-Object -Process { Copy-Item -Path $_.Value -Destination $_.Name } $sInvoke = @{ VM = $workVM ScriptType = 'Bash' ScriptText = $ExecutionContext.InvokeCommand.ExpandString($code1) GuestUser = $workCred.User GuestPassword = ConvertTo-SecureString -String $workCred.Password -AsPlainText -Force GuestOSType = 'Linux' Verbose = $true NoIPinCert = $true InFile = $isoFiles.Keys OutFile = $isoName } Invoke-VMScriptPlus @sInvoke Remove-Item -Path @($isoFiles.Keys) -Confirm:$false Move-Item -Path $isoName -Destination "..\$isoName" -Force -Confirm:$false |
Annotations
Line 4-7, 16-18: The script converts (copies) the provided YAML files to standard named YAML files. This allows the script to be used with different versions of the data and only needs a change in the $isoFiles hash table.
Line 32: This script uses the latest version of my Invoke-VMScriptPlus function. The reason is twofold: the bash script is multi-line and the script used the InFile/OutFile parameters to copy the YAML files to the Linux box and the ISO file back to the calling station.
User-Data
The user-data that is used for a Photon based instance is, for now, rather simple and straightforward.
Note the installation of the tdnf PowerShell package (as mentioned earlier in this post) in the runcmd section.
|
1 2 3 4 5 6 7 8 9 10 11 12 13 14 15 16 17 18 19 20 21 22 23 24 25 26 27 28 29 30 31 32 33 34 35 36 37 38 39 40 |
#cloud-config fqdn: PhotonPS.local.lab timezone: Europe/Brussels hostname: PhotonPS write_files: - path: /etc/systemd/network/10-static.network permissions: 0644 content: | [Match] Name=eth0 [Network] Address=192.168.10.81/24 Gateway=192.168.10.1 DNS=192.168.10.2 192.168.10.3 DHCP=no Domains=local.lab NTP=192.168.10.2 192.168.10.3 LinkLocalAddressing=no LLDP=true - path: /etc/systemd/network/99-dhcp-en.network permissions: 0644 content: | [Match] Name=e* [Network] DHCP=no - path: /etc/gnutls/default-priorities content: | SYSTEM=NONE:!VERS-SSL3.0:!VERS-TLS1.0:+VERS-TLS1.1:+VERS-TLS1.2:+AES-128-CBC:+RSA:+SHA1:+COMP-NULL runcmd: - tdnf distro-sync - tdnf update -y - tdnf install bindutils -y - tdnf install powershell -y - tdnf install gnuTLS -y - touch /etc/gnutls/default-priorities package_upgrade: true package_reboot_if_required: true |
Meta-data
If you plan on deploying multiple instance, just make sure that the instance-id has a unique value.
|
1 2 |
instance-id: iid-local01 local-hostname: photonps |
Sample Run
For a Photon instance the function is called like this.
|
1 2 3 4 5 6 7 8 9 10 11 12 13 14 15 16 17 18 19 |
$vmName = 'PhotonPS' # Get credential for logging on to the guest OS $viCred = Get-VICredentialStoreItem -Host $vmName $secPassword = ConvertTo-SecureString -String $viCred.Password -AsPlainText -Force $cred = [Management.Automation.PSCredential]::new($viCred.User, $secPassword) $sCloudInitVM = @{ OvaFile = 'D:\Repository\VMware\Photon\photon-hw13_uefi-3.0-9355405.ova' VmName = $vmName ClusterName = 'cluster' DsName = 'vsanDatastore' PgName = 'vdPg1' CloudConfigISO = '..\genisoimage-ps.iso' Photon = $true Credential = $cred Verbose = $true } Install-CloudInitVM @sCloudInitVM |
The result of this, since we used the Verbose switch, looks like this.
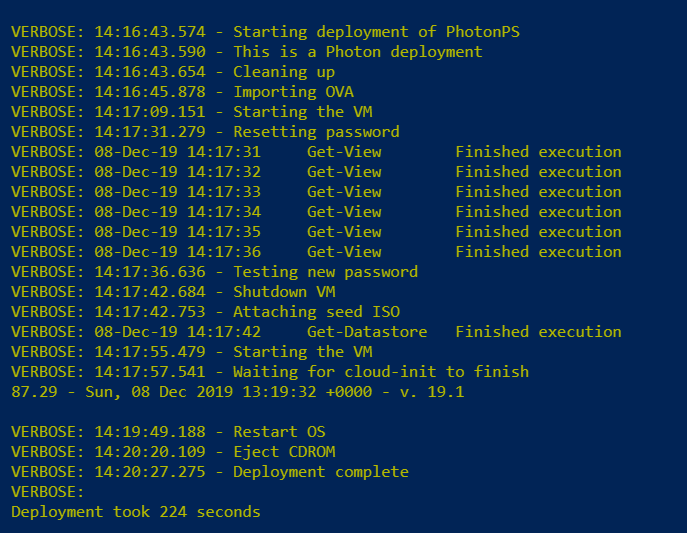
Again, don’t give too much importance to the total execution time. This was a run in my lab environment, which has limited resources.
On a side-note, notice how the PowerCLI cmdlets used in the function all show this, imho, annoying ‘Finished execution‘ message.
I would love to be able to suppress these verbose messages from the PowerCLI cmdlets. That is why I launched PowerCLI Idea #225 “Get rid of the over-eager verbosity on PowerCLI cmdlets“.
Enjoy!