
In Deploy Photon 2.0 – Part 1, we showed how to create a Template with the Photon 2.0 guest OS. In Part 2 we will introduce the New-PhotonVM function, which allows to create one or more VMs, based on the template created in Part 1.

The basic concept for the New-PhotonVM function is the same as for the New-PhotonTemplate function. The configuration for the VMs is driven by a JSON file that is passed as an argument to the function.
Create a Photon VM
This step is fully automated and driven by a JSON configuration file. In a matter of minutes you can create one or more Photon 2.0 VMs without even logging on to the machines!
The JSON Configuration file
The objective is again, as with the creation of the Template, to have all configuration parameters in a flat text file. This enables us to easily place the configuration of the VMs under version control and allows us to easily compare between versions.
The JSON file contains a number of Level-1 entries, each specifying part of the final configuration of the Photon VMs.
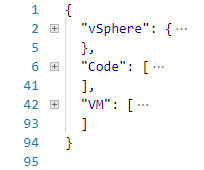
- vSphere: describes the Location for the template
- Code: a collection of customisation scripts.
- VM: an array of specifications for the VMs
vSphere

- VMHost: a cluster or an ESXi node where the VM will be installed. If you specify a cluster, the script takes a random ESXi node in that cluster.
- Storage: a datastorecluster or datastore where the VM will be installed.
Code
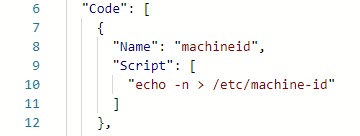
- Name: the name of this piece of code. Will be used later when creating VMs.
- Script: the customisation script, stored as an array of lines.
VM

- Name: the name of the VM to deploy
- Folder: a VM type folder where the VM shall stored in
- Deploy: a switch to define if this specific VM shall be created yes or no.
- TemplateName: the template from which the VM shall be created
- VMNote: content for the Note field of the VM. The #timestamp# field will be replaced by the actual date on which the VM is created
- NumCpu, MemeoryGB, HarddiskGB, GuestId: regular VM properties
- Network: a section with the network parameters for the VM
- Account: the root or administrator account to be used to login to the guest OS (as defined in the New-PhotonTemplate function).
- CustomisationCode: the names of the customisation scripts in the Code section that need to be executed inside the guest OS. The “reboot” entry is a reserved name, and will cause a reboot of the guest OS
Network
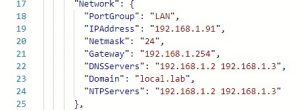
- Portgroup: the portgroup to which the vNic shall be connected
- IPAddress: the IP address
- Netmask: in CIDR notation
- Gateway: the gateway IP address
- DNSServers: one or more DNS servers. Multiple entries are separated with a space.
- Domain: the DNS domain to which the VM belongs
- NTPServers: one or more NTP servers. Multiple entries are separated with a space.
Account
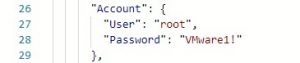
- User, Password: the root credentials
The New-PhotonVM function
Before you can run the New-PhotonVM function, you will need two functions that are used in the function. These are
- Invoke-VMScriptPlus from my Invoke-VMScriptPlus v2 post.
You have multiple options to make this function available to the New-PhotonVM function.
- Add it to the .ps1 file where you copied the New-PhotonVM function
- Store the function in a separate .ps1 file, and dot-source that .ps1 files before calling the New-PhotonVM function
- Create a module, and add the function to that module
The Code
|
1 2 3 4 5 6 7 8 9 10 11 12 13 14 15 16 17 18 19 20 21 22 23 24 25 26 27 28 29 30 31 32 33 34 35 36 37 38 39 40 41 42 43 44 45 46 47 48 49 50 51 52 53 54 55 56 57 58 59 60 61 62 63 64 65 66 67 68 69 70 71 72 73 74 75 76 77 78 79 80 81 82 83 84 85 86 87 88 89 90 91 92 93 94 95 96 97 98 99 100 101 102 103 104 105 106 107 108 109 110 111 112 113 114 115 116 117 118 119 120 121 122 123 124 125 126 127 128 129 130 131 132 133 134 135 136 137 138 139 140 141 142 143 144 145 146 147 148 149 150 151 152 153 154 155 156 157 158 159 160 161 162 163 164 165 166 167 168 169 170 171 172 173 174 175 |
function New-PhotonVM { <# .SYNOPSIS Create a Photon 2.0 VM from a template .DESCRIPTION This function will create a new VM from a Template with the Photon 2.0 guest OS. The parameters and the configuration scripts are passed via a JSON file. .NOTES Author: Luc Dekens Version: 1.0 11/08/18 Initial release 1.1 16/08/18 VMHost (in JSON file) accepts cluster of vmhost Added 'reboot' option Added 'Deploy' switch (in JSON file) .PARAMETER JSONPath The location of the JSON file with the configuration parameters .PARAMETER LogFile Optional file for capturing logging information. This includes the output of the customisation scripts .EXAMPLE New-PhotonVM -JSONPath .\photon.json .EXAMPLE New-PhotonVM -JSONPath .\photon.json -LogFile .\photon.log #> [cmdletbinding()] param( [Parameter(Mandatory = $true)] [string]$JSONPath, [string]$LogFile ) function Write-ToLog { [CmdletBinding()] param( [string]$Category, [string]$Text ) $timeStamp = (Get-Date).ToString('yyyyMMddThhmmss') $script = Split-Path -Path $myInvocation.ScriptName -Leaf $user = $env:UserName $line = "$timeStamp - $script - $user - [$Category] $Text" if ($LogFile) { $line | Out-File -FilePath $LogFile -Append } else { $line } } function Invoke-VMReboot { [CmdletBinding()] param( [string]$VMName ) $vmGuest = Get-VMGuest -VM $VMName Stop-VMGuest -VM $vm -Confirm:$false | Out-Null while ($vmGuest.VM.PowerState -ne 'PoweredOff') { Start-Sleep 1 $vmGuest = Get-VMGuest -VM $vmGuest.VM } $vmGuest = Start-VM -VM $vmGuest.VM -Confirm:$false | Get-VMGuest while ($vmGuest.VM.PowerState -ne 'PoweredOn' -or -not $vmGuest.ExtensionData.GuestOperationsReady) { Start-Sleep 1 $vmGuest = Get-VMGuest -VM $vmGuest.VM } } #region Get Parameters $paramDataJSON = Get-Content -Path $JSONPath | Out-String $paramData = ConvertFrom-Json -InputObject $paramDataJSON # Determine location for VM $obj = Get-Inventory -Name $paramData.vSphere.VMHost if ($obj -is [VMware.VimAutomation.ViCore.Types.V1.Inventory.Cluster]) { $obj = Get-VMHost -Location $obj | Get-Random } $esx = $obj $dsc = Get-DatastoreCluster -Name $paramData.vSphere.Storage -ErrorAction SilentlyContinue if ($dsc) { $ds = Get-Datastore -RelatedObject $dsc | Get-Random } else { $ds = Get-Datastore -Name $paramData.vSphere.Storage } foreach ($vmInfo in $paramData.VM) { # Do we need to deploy this VM if(-not $vmInfo.Deploy){ continue } # Clean up artifacts if ($vm = Get-VM -Name $vmInfo.Name -ErrorAction SilentlyContinue) { if ($vm.PowerState -eq [VMware.VimAutomation.ViCore.Types.V1.Inventory.PowerState]::PoweredOn) { Stop-VM -VM $vm -Confirm:$false | Out-Null } Remove-VM -VM $vm -Confirm:$false -DeletePermanently Write-ToLog -Category Info -Text "Removed VM $($vm.Name)" } # Create VM $sVM = @{ Name = $vmInfo.Name Template = $vmInfo.TemplateName VMHost = $esx Datastore = $ds Notes = $vmInfo.VMNote.Replace('#timestamp#', (Get-Date -Format 'dd/MM/yyyy HH:mm')) } if($vmInfo.Folder){ $sVM.Add('Location',(Get-FolderByPath -Path $vmInfo.Folder)) } $vm = New-VM @sVM Write-ToLog -Category Info -Text "Created VM $($vmInfo.Name)" # Configure VM Write-ToLog -Category Info -Text "Configuring network for VM $($vmInfo.Name)" Get-NetworkAdapter -VM $vm | Set-NetworkAdapter -NetworkName $vmInfo.Network.Portgroup -StartConnected:$true -Confirm:$false > $null Write-ToLog -Category Info -Text "Starting VM $($vmInfo.Name)" Start-VM -VM $vm > $null while ($vm.ExtensionData.Guest.ToolsRunningStatus -ne [VMware.Vim.VirtualMachineToolsRunningStatus]::guestToolsRunning -or $vm.ExtensionData.Runtime.PowerState -ne [VMware.Vim.VirtualMachinePowerState]::poweredOn) { sleep 2 $vm.ExtensionData.UpdateViewData() } Write-ToLog -Category Info -Text "VM $($vmInfo.Name) started" # Run all customisation scripts foreach ($code in $vmInfo.CustomisationCode) { if ($code -eq 'reboot') { Write-ToLog -Category Info -Text "Rebooting VM $($vm.Name)..." Invoke-VMReboot -VMName $vm.Name Write-ToLog -Category Info -Text "Rebooted VM $($vm.Name)" } else { $codeObj = $paramData.Code.Where{$_.Name -eq $code} $sInvoke = @{ VM = Get-VM -Id $vm.Id ScriptType = 'Bash' ScriptText = $ExecutionContext.InvokeCommand.ExpandString(($codeObj.Script -join "`r`n")) GuestUser = $vmInfo.Account.User GuestPassword = ConvertTo-SecureString -String $vmInfo.Account.Password -AsPlainText -Force GuestOSType = 'Linux' } if($codeObj.Environment){ $sInvoke.Add('ScriptEnvironment',$codeObj.Environment.foreach{$ExecutionContext.InvokeCommand.ExpandString($_)}) } Write-ToLog -Category Info -Text "Running $code" $result = Invoke-VMScriptPlus @sInvoke if ($LogFile) { $result | Out-File -FilePath $LogFile -Append } else { $result } } } } } |
Annotations
Line 34-52: An inline function to have all messages in the same format.
Line 54-73: A reboot the guest OS function. Called when the “reboot” instruction is encountered. See later.
Line 77-78: These lines read the JSON file and convert the data to a PowerShell object
Line 82-86: The vSphere.VMHost field can contain a cluster or an ESXi node. These lines handle those options. In case of a cluster, the function selects a random ESXi node from the cluster.
Line 88-94: The vSphere.Storage field can contain a DatastoreCluster or a Datastore. These lines handle those options. In case of a datastorecluster, the function selects a random datastore from the datastorecluster.
Line 96: the function will run through all entries under the VM field
Line 100-102: Only deploy the VM when the Deploy field says true
Line 105-111: These lines check if there is already a VirtualMachine with the name as specified in VM.Name. If there is, the VirtualMachine is removed.
Line 114-132: The VM is created
Line 126: The Get-FolderByPath function can be found in Folder By Path
Line 133-139: The VM is powered on, and the function waits till the VMware Tools are available
Line 145-173: The function runs all the requested customisation scripts, as defined in the VM.CustomisationCode field.
Line 146-151: This handles the reserved “reboot” name, and restarts the guest OS. The inline function Invoke-VMReboot waits till the VMware Tools are available again.
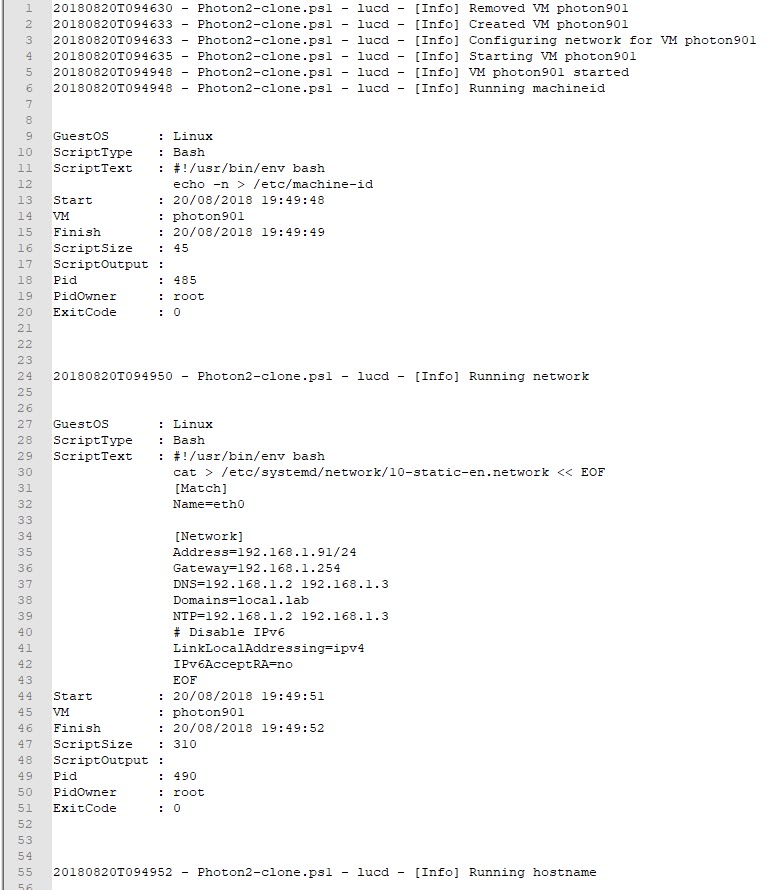
Sample Run
The actual call to the New-PhotonVM function is quite simple. The function only has two parameters, the location of the JSON file (JSONPath), and optionally a file where the output of the function will be saved (LogFile). If no LogFile is given, the output will be shown in the console.
|
1 2 3 4 |
$logFile = 'C:\Temp\photon-template.log' $json = '.\LabPhoton.json' New-PhotonVM -JSONPath $json -LogFile $logFile |
The logfile contains the key steps in the function, and also the output produced by the calls to Invoke-VMScriptPlus.
A sample extract of such a log file.
Files
Attached to this post is an empty, skeleton JSON file and to be used with the New-PhotonVM function.
Next
In Part 3 of this series I will be showing some examples of what you can do with such Photon 2.0 VMs, and more specifically containers.
Enjoy!
David S
Is part three of this series posted?
LucD
Not yet, coming shortly.
synth3tk
“The New-PhotonVM function” section mentions needing two functions, but fails to talk about the second one (Get-FolderByPath). I ran into errors because of it.