
In my previous post DSCR for VMware and you! I described the open source project that was started to develop DSC resources for vSphere (DSCR). One of the requirements for contributing, is that you provide Unit and Integration Pester tests for any new DSC resource you contribute to DSCR.
The vSphere environment and VMware PowerCLI have some peculiarities that will require you to use some specific Pester techniques to write these Pester tests. This post should help you understand how this done. This is not intended as a Pester course, there are other, and better, resources for that.
Some Basics
Describe + It
Since most of us are not regular or experienced Pester test writers, I will start with some basic concepts, before diving into more vSphere specific techniques. Just follow along.
From the Pester Wiki we learn that ”
Pester is a Behavior-Driven Development (BDD) based test runner for PowerShell “. One of the guiding principles in BDD is ”
… tests of any unit of software should be specified in terms of the desired behavior of the unit“.
In short, we are going to write tests to verify that our code behaves as we expect it to behave, in all possible circumstances. And these tests will also allow us to verify that any future changes to the code do not break it.
In its most basic format, a Pester test consists of a Describe block, a way of logically organising tests, and an It block, in which we assert a test. The word assert comes from the Arrange-Act-Assert pattern.
Time to see some code. The following is a very simplistic test setup.
|
1 2 3 4 5 6 7 8 9 |
function Do-Something { return "Doing something" } Describe 'Test doing something' -Tag 'OurTest' { It 'Function called' { Do-Something | Should -Be 'Doing something' } } |
We are testing a function Do-Something. For that we start a Describe block. In that block, we have one It block. And in that It block we assert that our function returns what we expect it to return.
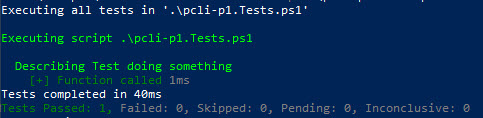
In this test, which succeeded, we verified that our Do-Something function actually returned the text we expected.
If we test for another return value
|
1 2 3 4 5 6 7 8 9 |
function Do-Something { return "Doing something" } Describe 'Test doing something' -Tag 'OurTest' { It 'Function called' { Do-Something | Should -Be 'Not Doing something' } } |
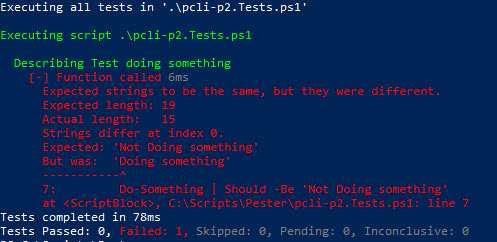
we get a failed test.
Mocking
In the previous examples we actually called our function. Executing the function did not do anything, it did not change anything in our environment. But not all functions or cmdlets are harmless like that.
For those types of functions and cmdlets we “mock” the real function/cmdlet.
|
1 2 3 4 5 6 7 8 9 10 11 12 13 |
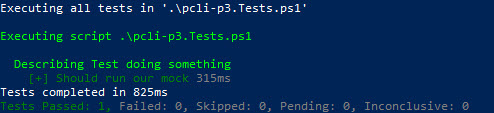
function Do-Something{ Write-Host "Doing something" } Describe 'Test doing something' -Tag 'OurTest' { Mock -CommandName Do-Something -MockWith {'Something else'} It 'Should run our mock' { Do-Something Assert-MockCalled -CommandName Do-Something -Exactly 1 } } |
In this example we introduce two new Pester commands. The Mock command and the Assert-MockCalled command.
With the Mock command we “…
specify a script block that will become the command’s new behavior “. And Assert-MockCalled “…
verifies that a mocked command has been called a certain number of times“.
Context
We already saw the Describe block as a way of keeping related tests together, but we go one level deeper with the Context command. It ”
Provides logical grouping of It blocks within a single Describe block“.
|
1 2 3 4 5 6 7 8 9 10 11 12 13 14 15 16 17 18 19 20 21 22 23 24 25 26 27 28 29 30 31 |
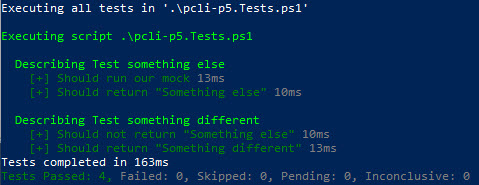
function Do-Something{ Write-Host "Doing something" } Describe 'Test something else' -Tag 'OurTest' { Context 'Something else' { Mock -CommandName Do-Something -MockWith {'Something else'} It 'Should run our mock' { Do-Something Assert-MockCalled -CommandName Do-Something -Exactly 1 } It 'Should return "Something else"' { Do-Something | Should -Be 'Something else' } } Context 'Test something different' { Mock -CommandName Do-Something -MockWith {'Something different'} It 'Should not return "Something else"' { Do-Something | Should -Not -Be 'Something else' } It 'Should return "Something different"' { Do-Something | Should -Be 'Something different' } } } |
Which results in
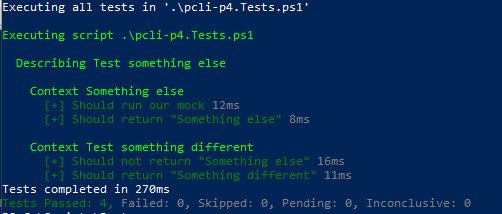
Notice how the test results follow the subdivision we created with our Describe and Context blocks.
Tags
A final feature I want to mention in this (very) basic Pester intro, is the concept of using Tags. On the Describe command, you can use the Tag parameter. These tags are a kind of label. When you run the Pester tests (with Invoke-Pester), you can specify wich tests shall be executed by specifying tags.
|
1 2 3 4 5 6 7 8 9 10 11 12 13 14 15 16 17 18 19 20 21 22 23 24 25 26 27 28 29 |
function Do-Something{ Write-Host "Doing something" } Describe 'Test something else' -Tag 'OurTest' { Mock -CommandName Do-Something -MockWith {'Something else'} It 'Should run our mock' { Do-Something Assert-MockCalled -CommandName Do-Something -Exactly 1 } It 'Should return "Something else"' { Do-Something | Should -Be 'Something else' } } Describe 'Test something different' -Tag 'HisTest' { Mock -CommandName Do-Something -MockWith {'Something different'} It 'Should not return "Something else"' { Do-Something | Should -Not -Be 'Something else' } It 'Should return "Something different"' { Do-Something | Should -Be 'Something different' } } |
When we run this by just doing
|
1 |
Invoke-Pester -Script .\pcli-p5.Tests.ps1 |
we get
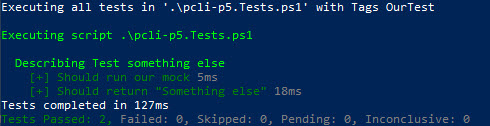
but if we use the Tag parameter, we can do
|
1 |
Invoke-Pester -Script .\pcli-p5.Tests.ps1 -Tag 'OurTest' |
and that results in
PowerCLI
Single Cmdlet
As we already saw earlier, we can simulate the behaviour of cmdlets with the Mock command. Since we do not want any PowerCLI cmdlets we are using, to actually go out to a real vSphere environment, which might not even be there, we are going to use the Mock command.
|
1 2 3 4 5 6 7 8 9 10 11 12 13 |
function Do-PCLIStuff{ Get-VMHost } Describe 'PowerCLI Testing'{ Mock -CommandName Get-VMHost -MockWith {} Do-PcliStuff It 'Should call VMHost' { Assert-MockCalled -CommandName Get-VMHost -Exactly 1 } } |
The function calls the PowerCLI cmdlet Get-VMHost and were mocking that cmdlet with an empty scriptblock. The result is similar to what we see earlier.

But we probably also want to check if our code is passing the correct parameters to the Get-VMHost cmdlet. That is where the ParameterFilter on the Mock command comes into play.
|
1 2 3 4 5 6 7 8 9 10 11 12 13 14 15 16 17 18 19 |
function Do-PCLIStuff{ param( [string]$Name ) Get-VMHost -Name $Name } $script:TestName = 'MyHost' Describe 'PowerCLI Testing'{ Mock -CommandName Get-VMHost -MockWith {} -ParameterFilter {$Name -eq $script:TestName} Do-PcliStuff -Name $script:TestName It 'Should call VMHost' { Assert-MockCalled -CommandName Get-VMHost -Exactly 1 } } |
Which results in

If we call the function with another value for the Name parameter, our test will fail.
|
1 2 3 4 5 6 7 8 9 10 11 12 13 14 15 16 17 18 19 |
function Do-PCLIStuff{ param( [string]$Name ) Get-VMHost -Name $Name } $script:TestName = 'MyHost' Describe 'PowerCLI Testing'{ Mock -CommandName Get-VMHost -MockWith {} -ParameterFilter {$Name -eq $script:TestName} Do-PcliStuff -Name "$($script:TestName)_suffix" It 'Should call VMHost' { Assert-MockCalled -CommandName Get-VMHost -Exactly 1 } } |
which results in

What we are seeing here is interesting to further analyse. Our mock for Get-VMHost was not taken due to the ParameterFilter we used. So that is working as desired.
But as a consequence, the test now used the “real” Get-VMHost, which we can see by the fact that the cmdlet complains there is no connection.
One way of avoiding that is by creating a kind of catch-all Mock.
|
1 2 3 4 5 6 7 8 9 10 11 12 13 14 15 16 17 18 19 20 21 22 23 24 25 |
function Do-PCLIStuff{ param( [string]$Name ) Get-VMHost -Name $Name } $script:TestName = 'MyHost' Describe 'PowerCLI Testing'{ Mock -CommandName Get-VMHost -MockWith {return "All is well"} -ParameterFilter {$Name -eq $script:TestName} Mock -CommandName Get-VMHost -MockWith {return "Catch-all"} $result = Do-PcliStuff -Name "$($script:TestName)_suffix" It 'Should call VMHost' { Assert-MockCalled -CommandName Get-VMHost -Exactly 1 } It 'Desired mock taken' { $result | Should -Be "All is well" } } |

We do get a failed test, but at least our testing is not calling the real cmdlet anymore.
Cmdlets in a Pipeline
We often use the pipeline to link two cmdlets together. Testing such a construct only requires adding additional mocks.
|
1 2 3 4 5 6 7 8 9 10 11 12 13 14 15 16 17 18 19 20 21 22 23 24 |
function Do-PCLIStuff{ param( [string]$Name ) Get-VMHost -Name $Name | Get-VM } $script:TestName = 'MyHost' Describe 'PowerCLI Testing'{ Mock -CommandName Get-VMHost -MockWith {} -ParameterFilter {$Name -eq $script:TestName} Mock -CommandName Get-VM -MockWith {} $result = Do-PcliStuff -Name $script:TestName It 'Should call Get-VMHost' { Assert-MockCalled -CommandName Get-VMHost -Exactly 1 } It 'Should call Get-VM' { Assert-MockCalled -CommandName Get-VM -Exactly 1 } } |

That was easy.
Mocking the Module
But what if there are conditions on properties. For example a Where-clause, in the pipeline construct that tests if a VMHost has four or less CPUs? How do we test if our code is handling that correctly in all possible scenarios.
|
1 |
Get-VMHost -Name $Name | where{$_.NumCpu -le 4} | Get-VM |
We need to be able to mock the output of the Get-VMHost cmdlet. Unfortunately, the way PowerCLI types are currently set up, we can not just create new PowerCLI objects and assign values to their properties. In fact there is a PowerCLI Idea open to change that behaviour.
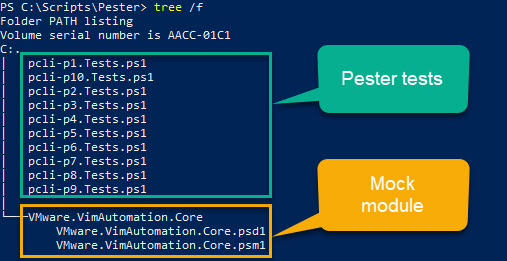
The solution that DSCR has chosen is to create a mock module VMware.VimAutomation.Core. This is the module where most PowerCLI types are defined.
If we replace that module with our own module, we can completely manipulate PowerCLI objects. And we can make sure that our Pester tests use that module, by explicitly importing it in our test script.
For the test scripts in this post I used a very simple setup.
In the mock module VMware.VimAutomation.Core we have the following content.
|
1 2 3 4 5 6 7 8 9 10 11 12 13 14 15 16 17 18 19 20 21 22 23 24 25 26 27 28 29 30 31 32 33 34 35 |
Add-Type -TypeDefinition @" namespace VMware.Vim { public class VMHost { // Property used only for comparing VMHost objects. public string Id { get; set; } public string Name { get; set; } public int NumCpu { get; set; } } } "@ function Get-VMHost { param( [PSObject] $Server, [string] $Name ) return New-Object VMware.Vim.VMHost } function Get-VM { param( [PSObject] $Server, [string]$Name, [parameter(ValueFromPipeline)] [PSObject] $Location ) return $null } |
Annotations
| Line | Annotation |
|---|---|
| 1-15 | Use the Add-Type cmdlet to create the class VMware.Vim.VMHost with the properties we require, i.e. NumCpu |
| 2 | All classes are defined in the VMware.Vim namespace |
| 17-24 | Define our version of the Get-VMHost cmdlet |
| 26-35 | Define our version of the Get-VM cmdlet |
| 30-31 | Define the Location parameter to accept pipeline values of type PSObject. |
Our test script now imports our mock module. This allows us to specify exactly what the Get-VMHost cmdlet is going to return via a hashtable that we use the define the content of the object that is returned by our Get-VMHost mock.
And since we defined what kind of parameter our Get-VM cmdlet accepts over the pipeline, we can combine our cmdlets in a pipeline construct.
|
1 2 3 4 5 6 7 8 9 10 11 12 13 14 15 16 17 18 19 20 21 22 23 24 25 26 27 28 29 30 31 32 33 34 35 36 |
function Do-PCLIStuff{ param( [string]$Name ) Get-VMHost -Name $Name | where{$_.NumCpu -le 4} | Get-VM } $script:TestName = 'MyHost' Import-Module -Name .\VMware.VimAutomation.Core -Verbose Describe 'PowerCLI Testing'{ $vmHostMock = { return [VMware.Vim.VMHost] @{ Id = 'VMHostId' Name = 'esx1' NumCpu = 4 } } Mock -CommandName Get-VMHost -MockWith $vmHostMock -ParameterFilter {$Name -eq $script:TestName} Mock -CommandName Get-VM -MockWith {} $result = Do-PcliStuff -Name $script:TestName It 'Should call Get-VMHost' { Assert-MockCalled -CommandName Get-VMHost -Exactly 1 } It 'Should call Get-VM' { Assert-MockCalled -CommandName Get-VM -Exactly 1 } } |
The results in

Notice how I used the Verbose switch to show where our mock module is coming from.
Now that we have the pipeline construct working we can add test cases for multiple possibilities.
This is a good moment to introduce different Context blocks for different test cases. We will do one context for an ESXi node with 4 CPU and another context for an ESXi node with 8 CPU.
|
1 2 3 4 5 6 7 8 9 10 11 12 13 14 15 16 17 18 19 20 21 22 23 24 25 26 27 28 29 30 31 32 33 34 35 36 37 38 39 40 41 42 43 44 45 46 47 48 49 50 51 52 53 54 55 56 57 58 59 60 61 |
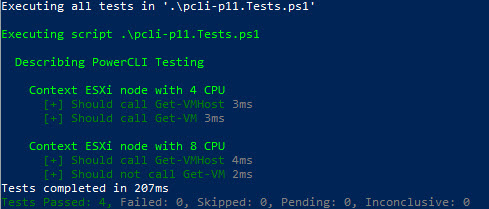
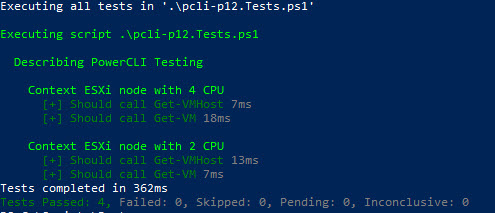
function Do-PCLIStuff{ param( [string]$Name ) Get-VMHost -Name $Name | where{$_.NumCpu -le 4} | Get-VM } $script:TestName = 'MyHost' Import-Module -Name .\VMware.VimAutomation.Core Describe 'PowerCLI Testing' { Context 'ESXi node with 4 CPU' { $vmHostMock = { return [VMware.Vim.VMHost] @{ Id = 'VMHostId' Name = 'esx1' NumCpu = 4 } } Mock -CommandName Get-VMHost -MockWith $vmHostMock -ParameterFilter {$Name -eq $script:TestName} Mock -CommandName Get-VM -MockWith {} -ParameterFilter {$Location.Name -eq 'esx1'} $result = Do-PcliStuff -Name $script:TestName It 'Should call Get-VMHost' { Assert-MockCalled -CommandName Get-VMHost -Exactly 1 } It 'Should call Get-VM' { Assert-MockCalled -CommandName Get-VM -Exactly 1 } } Context 'ESXi node with 8 CPU' { $vmHostMock = { return [VMware.Vim.VMHost] @{ Id = 'VMHostId' Name = 'esx1' NumCpu = 8 } } Mock -CommandName Get-VMHost -MockWith $vmHostMock -ParameterFilter {$Name -eq $script:TestName} Mock -CommandName Get-VM -MockWith {} $result = Do-PcliStuff -Name $script:TestName It 'Should call Get-VMHost' { Assert-MockCalled -CommandName Get-VMHost -Exactly 1 } It 'Should not call Get-VM' { Assert-MockCalled -CommandName Get-VM -Exactly 0 } } } |
Notice how have test for zero calls to Get-VM in the second context. Due to the Where-clause that VMHost object should not get through. The result
If you look at the ParameterFilter on the Get-VM mock in the first context block, you will notice that we test a specific property of the VMHost object. Would it not be better to be able to test on the complete VMHost object?
Of course it would, but for that we need to adapt our VMHost class in our mock module. We need to add the IEquatable interface to the class. That adds to our class the ability to determine if two instances of the class are identical.
|
1 2 3 4 5 6 7 8 9 10 11 12 13 14 15 16 17 18 19 20 21 22 23 24 25 26 27 28 29 30 31 32 33 34 35 36 37 38 39 40 41 42 43 44 45 46 47 48 49 |
Add-Type -TypeDefinition @" namespace VMware.Vim { public class VMHost : System.IEquatable<VMHost> { // Property used only for comparing VMHost objects. public string Id { get; set; } public string Name { get; set; } public int NumCpu { get; set; } public bool Equals(VMHost vmhost) { return vmhost != null && this.Id == vmhost.Id && this.Name == vmhost.Name; } public override bool Equals(object vmhost) { return this.Equals(vmhost as VMHost); } public override int GetHashCode() { return (this.Id + "_" + this.Name + "_" + this.NumCpu).GetHashCode(); } } } "@ function Get-VMHost { param( [PSObject] $Server, [string] $Name ) return New-Object VMware.Vim.VMHost } function Get-VM { param( [PSObject] $Server, [string]$Name, [parameter(ValueFromPipeline)] [PSObject] $Location ) return $null } |
And we can adapt the ParameterFilter.
|
1 2 3 4 5 6 7 8 9 10 11 12 13 14 15 16 17 18 19 20 21 22 23 24 25 26 27 28 29 30 31 32 33 34 35 36 37 38 39 40 41 42 43 44 45 46 47 48 49 50 51 52 53 54 55 56 57 58 59 60 61 62 63 64 65 66 |
function Do-PCLIStuff{ param( [string]$Name ) Get-VMHost -Name $Name | where{$_.NumCpu -le 4} | Get-VM } $script:TestName = 'MyHost' Import-Module -Name .\VMware.VimAutomation.Core Describe 'PowerCLI Testing' { Context 'ESXi node with 4 CPU' { $vmHost = [VMware.Vim.VMHost] @{ Id = 'VMHostId' Name = 'esx1' NumCpu = 4 } $vmHostMock = { return [VMware.Vim.VMHost] @{ Id = 'VMHostId' Name = 'esx1' NumCpu = 4 } } Mock -CommandName Get-VMHost -MockWith $vmHostMock -ParameterFilter {$Name -eq $script:TestName} Mock -CommandName Get-VM -MockWith {} -ParameterFilter {$Location -eq $vmHost} $result = Do-PcliStuff -Name $script:TestName It 'Should call Get-VMHost' { Assert-MockCalled -CommandName Get-VMHost -Exactly 1 } It 'Should call Get-VM' { Assert-MockCalled -CommandName Get-VM -Exactly 1 } } Context 'ESXi node with 2 CPU' { $vmHostMock = { return [VMware.Vim.VMHost] @{ Id = 'VMHostId' Name = 'esx1' NumCpu = 2 } } Mock -CommandName Get-VMHost -MockWith $vmHostMock -ParameterFilter {$Name -eq $script:TestName} Mock -CommandName Get-VM -MockWith {} -ParameterFilter {$Location -eq $null} $result = Do-PcliStuff -Name $script:TestName It 'Should call Get-VMHost' { Assert-MockCalled -CommandName Get-VMHost -Exactly 1 } It 'Should call Get-VM' { Assert-MockCalled -CommandName Get-VM -Exactly 0 } } } |
The result of a run looks the same, with the difference that we now compared the complete VMHost object.
vSphere
Get-View and ExtensionData
We all know that sometimes we have go into the vSphere API to retieve properties or to call methods that are not exposed directly through any of the PowerCLI cmdlets.
The code behind DSCR is no different. But how will we test access to these vSphere API properties or calls to any of the vSphere API methods?
Turns out that this is not very different from what we already did for the PowerCLI cmdlets. We define the vSphere API objects in our mock module. And we can mock the Get-View cmdlet and the ExtensionData property.
In the following example we have code that looks at the current EVCMode ofan ESXi node, and then returns that mode in a more human readable format. Nothing too fancy.
|
1 2 3 4 5 6 7 8 9 10 11 12 13 14 15 16 |
function Do-PCLIStuff{ param( [string]$Name ) $esx = Get-VMHost -Name $Name switch($esx.ExtensionData.Summary.CurrentEVCModeKey) { 'intel-merom' {'Intel® “Merom” Generation'} 'intel-penryn' {'Intel® “Penryn” Generation'} 'intel-nehalem' {'Intel® “Nehalem” Generation'} 'intel-westmere' {'Intel® “Westmere” Generation'} 'intel-sandybridge' {'Intel® “Sandy Bridge” Generation'} 'intel-ivybridge' {'Intel® “Ivy Bridge” Generation'} } } |
Since we are fetching values under ExtensionData we will have to define the required classes and properties in our mock module. We add the HostExtensionData and HostListSummary classes to our module mock.
Note that we only added the properties that are required for this test case. When more test cases are created, the class definitions will be expanded.
|
1 2 3 4 5 6 7 8 9 10 11 12 13 14 15 16 17 18 19 20 21 22 23 24 25 26 27 28 29 30 31 32 33 34 35 36 37 38 39 40 41 |
Add-Type -TypeDefinition @" namespace VMware.Vim { public class HostListSummary { public string CurrentEVCModeKey { get; set; } } public class HostExtensionData { public HostListSummary Summary { get; set; } } public class VMHost : System.IEquatable<VMHost> { // Property used only for comparing VMHost objects. public string Id { get; set; } public string Name { get; set; } public int NumCpu { get; set; } public HostExtensionData ExtensionData { get; set; } public bool Equals(VMHost vmhost) { return vmhost != null && this.Id == vmhost.Id && this.Name == vmhost.Name; } public override bool Equals(object vmhost) { return this.Equals(vmhost as VMHost); } public override int GetHashCode() { return (this.Id + "_" + this.Name + "_" + this.NumCpu).GetHashCode(); } } } "@ |
Our test script looks like this.
|
1 2 3 4 5 6 7 8 9 10 11 12 13 14 15 16 17 18 19 20 21 22 23 24 25 26 27 28 29 30 31 32 33 34 35 36 37 38 39 40 41 42 43 44 45 46 47 48 49 50 51 52 53 54 |
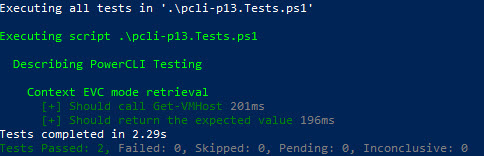
function Do-PCLIStuff{ param( [string]$Name ) $esx = Get-VMHost -Name $Name switch($esx.ExtensionData.Summary.CurrentEVCModeKey) { 'intel-merom' {'Intel® “Merom” Generation'} 'intel-penryn' {'Intel® “Penryn” Generation'} 'intel-nehalem' {'Intel® “Nehalem” Generation'} 'intel-westmere' {'Intel® “Westmere” Generation'} 'intel-sandybridge' {'Intel® “Sandy Bridge” Generation'} 'intel-ivybridge' {'Intel® “Ivy Bridge” Generation'} } } $script:TestName = 'MyHost' Import-Module -Name .\VMware.VimAutomation.Core Describe 'PowerCLI Testing' { Context 'EVC mode retrieval' { $vmHost = [VMware.Vim.VMHost] @{ Id = 'VMHostId' Name = 'MyHost' NumCpu = 4 } $vmHostMock = { return [VMware.Vim.VMHost] @{ Id = 'VMHostId' Name = 'MyHost' ExtensionData = [VMware.Vim.HostExtensionData] @{ Summary = [VMware.Vim.HostListSummary] @{ CurrentEVCModeKey = 'intel-merom' } } } } Mock -CommandName Get-VMHost -MockWith $vmHostMock -ParameterFilter {$Name -eq $script:TestName} $result = Do-PcliStuff -Name $script:TestName It 'Should call Get-VMHost' { Assert-MockCalled -CommandName Get-VMHost -Exactly 1 } It 'Should return the expected value' { $result | Should -Be 'Intel® “Merom” Generation' } } } |
And all our tests pass.
But what when we want test a call to an API method?
Again, the trick is in defining the required method in the class definition in the mock module. In this case we a method, named RetrieveHardwareUptime , to the HostExtensionData class. For this particular test we are not interested in the actual value that is returned, just in the type.
|
1 2 3 4 5 6 7 8 9 10 11 12 13 14 15 16 17 18 19 20 21 22 23 24 25 26 27 28 29 30 31 32 33 34 35 36 37 38 39 40 41 42 43 44 45 46 47 |
Add-Type -TypeDefinition @" namespace VMware.Vim { public class HostListSummary { public string CurrentEVCModeKey { get; set; } } public class HostExtensionData { public HostListSummary Summary { get; set; } public long RetrieveHardwareUptime() { long result = 1; return result; } } public class VMHost : System.IEquatable<VMHost> { // Property used only for comparing VMHost objects. public string Id { get; set; } public string Name { get; set; } public int NumCpu { get; set; } public HostExtensionData ExtensionData { get; set; } public bool Equals(VMHost vmhost) { return vmhost != null && this.Id == vmhost.Id && this.Name == vmhost.Name; } public override bool Equals(object vmhost) { return this.Equals(vmhost as VMHost); } public override int GetHashCode() { return (this.Id + "_" + this.Name + "_" + this.NumCpu).GetHashCode(); } } } "@ |
With the method in place, we can now write our test script. Note that we test the returned (and hard coded) value and the type.
|
1 2 3 4 5 6 7 8 9 10 11 12 13 14 15 16 17 18 19 20 21 22 23 24 25 26 27 28 29 30 31 32 33 34 35 36 37 38 39 40 |
function Do-PCLIStuff{ param( [string]$Name ) $esx = Get-VMHost -Name $Name $esx.ExtensionData.RetrieveHardwareUptime() } $script:TestName = 'MyHost' Import-Module -Name .\VMware.VimAutomation.Core Describe 'PowerCLI Testing' { Context 'Hardware Uptime' { $vmHostMock = { return [VMware.Vim.VMHost] @{ Id = 'VMHostId' Name = 'MyHost' ExtensionData = [VMware.Vim.HostExtensionData] @{} } } Mock -CommandName Get-VMHost -MockWith $vmHostMock -ParameterFilter {$Name -eq $script:TestName} $result = Do-PcliStuff -Name $script:TestName It 'Should call Get-VMHost' { Assert-MockCalled -CommandName Get-VMHost -Exactly 1 } It 'Should return the expected type' { $result | Should -BeOfType [long] } It 'Should return the expected value' { $result | Should -Be 1 } } } |
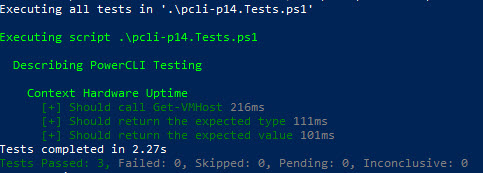
Note that in the current Pester version it is not possible to test object methods. In other words we can not test, at this point in time, if the RetrieveHardwareUptime method is called.
Esxcli
For some properties and for some methods a call of the esxcli command is sometimes the only available or fastest method. In PowerCLI we have the Get-EsxCli cmdlet that allows us to do these calls. But how do we Pester test such calls?
Turns out we can mock the complete esxcli object.
|
1 2 3 4 5 6 7 8 9 10 11 12 13 14 15 16 17 18 19 20 21 22 23 24 25 26 27 28 29 30 31 32 33 34 35 36 37 38 39 40 41 42 43 44 45 46 47 48 49 50 51 52 53 54 55 56 57 58 59 60 |
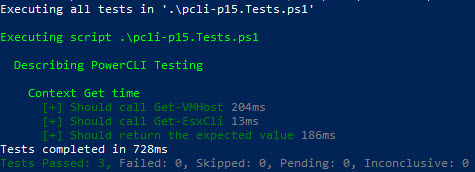
function Do-PCLIStuff{ param( [string]$Name ) $esx = Get-VMHost -Name $Name $esxcli = Get-EsxCli -VMHost $esx -V2 $esxcli.system.time.get.Invoke() } $script:TestName = 'MyHost' Import-Module -Name .\VMware.VimAutomation.Core Describe 'PowerCLI Testing' { Context 'Get time' { $vmhostObject = [VMware.Vim.VMHost] @{ Id = 'VMHostId' Name = 'MyHost' } $timeString = (Get-Date '01/01/2019 00:00').ToUniversalTime().ToString('yyyy-MM-ddTHH:mm:ss.000Z') $vmHostMock = { return [VMware.Vim.VMHost] @{ Id = 'VMHostId' Name = 'MyHost' } } $esxCliMock = { $esxcli = New-Object PSObject $esxcli | Add-Member -MemberType NoteProperty -Name 'id' -Value 'esxCli Id' $esxcli | Add-Member -MemberType NoteProperty -Name 'system' -Value (New-Object PSObject) $esxcli.system | Add-Member -MemberType NoteProperty -Name 'time' -Value (New-Object PSObject) $esxcli.system.time | Add-Member -MemberType NoteProperty -Name 'get' -Value (New-Object PSObject) $esxcli.system.time.get | Add-Member -MemberType ScriptMethod -Name 'Invoke' -Value { $timeString } return $esxcli } Mock -CommandName Get-VMHost -MockWith $vmHostMock -ParameterFilter {$Name -eq $script:TestName} Mock -CommandName Get-EsxCli -MockWith $esxcliMock -ParameterFilter {$VMHost -eq $vmhostObject} $result = Do-PcliStuff -Name $script:TestName It 'Should call Get-VMHost' { Assert-MockCalled -CommandName Get-VMHost -Exactly 1 } It 'Should call Get-EsxCli' { Assert-MockCalled -CommandName Get-EsxCli -Exactly 1 } It 'Should return the expected value' { $result | Should -Be $timeString } } } |
We construct the $esxCliMock code block in such a way that it will return an object, with an Invoke() method, via the ScriptMethod type, that returns the value.
For the test script we will also have to create a definition for the Get-EsxCli cmdlet in our mock module. The purpose is to have a declaration of the required parameters for the Get-EsxCli cmdlet. Remember that we are replacing the regular PowerCLI module that contains the Get-EsxCli cmdlet, with our mock module.
|
1 2 3 4 5 6 7 8 9 |
function Get-EsxCli { param( [PSObject] $Server, [VMware.Vim.VMHost] $VMHost, [switch] $V2 ) return $null } |
And this results in
Conclusion
Writing Pester Unit tests for code that uses VMware PowerCLI and that works against a vSphere environment, is not intuitive at all at first sight.
One has to take into account the many peculiarities that exist. And more importantly, one has to reflect on how one can “mock” all the techniques you normally use in your VMware PowerCLI code.
I hope this short overview of some techniques will encourage you to start writing Pester tests, not only for DSCR, but also for your own scripts. In the end, having testing in place will help you a lot when you need to change/update your code.
I encourage you all to share your Pester tests for PowerCLI scripts. And I welcome all suggestions for additions or updates to this post.
Enjoy!
Vitaliy
Hi Luc.
I have carefully studied these tips in the VMware community regarding the use of Start-Job d powercli.
At the moment I have a task to deploy new VMs from Template in parallel.
My script works now for sequential execution, however when I try to run it through Start-Job, then some tasks are completed with an error (approximately 50 out of 100) “New-VM” or with an error “New -VM Value cannot be null “. In this case, all the parameters that are used in New-VM are well collected and displayed when using Start-Job. At the same time, I also noticed that if you run tasks with sleep -secconds in about 30 milliseconds, then more tasks complete successfully.
Could you help me in solving this problem?
Thank you for your help and understanding, I look forward to your reply.
LucD
Hi Vitaliy,
I would need to see your code to analyse what might be the problem.
You can use the Contact form on here to send me the script as an attachment.